

0
Owner's of the 3Com Switch 5500-EI gave it a score of 0 out of 5. Here's how the scores stacked up:


Packing and Shipping the Switch 5500 51
CAUTION: When installing and removing an Optional Interface Module,
note that:
■ Do not exert excessive force on the module or touch the components
on the module surface.
■ If you are not installing a new module, insert a blank filler panel to
keep the dust out and to ensure normal ventilation within the switch.
Packing and
Shipping the Switch
5500
This section describes how to correctly package your Switch 5500 should
you need to return the switch to 3Com.
WARNING: If you are returning the unit to 3Com for repair, ensure that
you fit the rear blanking plates for the PSU and module. If 3Com receives
the unit without the blanking plates in place your warranty could be
invalidated.
WARNING: Package the unit correctly to ensure that you do not
invalidate the repair.
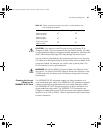
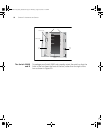
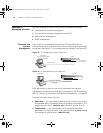
The Switch 5500G To package your Switch 5500G unit correctly:
1 For the 5500G unit, orientate your switch so that the PSU blanking plate
is on the left (looking down at the top of the unit) as shown in
Figure 19.
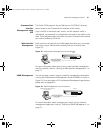
2 Secure one of the polystyrene supports to side of the unit with the PSU
blanking plate, ensuring that the wider recess on the support is fitted
around the blanking plate. Secure the remaining support to the opposite
side of the unit in the same way.
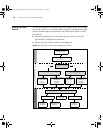
3 Place the unit in the box with the PSU blanking plate side placed next to
the cable packaging.
Figure 19 Correct Orientation When Packing the Switch 5500G-EI
10014925-AD_S5500_GSG.book Page 51 Thursday, August 16, 2007 12:29 PM


Find Your Products By Category
- Photography
- Video Game
- Computer Equipment
- TV and Video
- Communications
- Automotive
- Portable Media
- Marine Equipment
- Cell Phone
- Baby
- Home Audio
- Fitness & Sports
- Power Tools
- Household Appliance
- Car Audio and Video
- Personal Care
- Kitchen Appliance
- Lawn and Garden
- Musical Instruments & Equipment
- Laundry Appliance
- Outdoor Cooking
Please Login
