

0
Owner's of the 3Com Switch 5500-EI gave it a score of 0 out of 5. Here's how the scores stacked up:
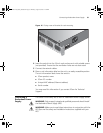


Placing Units On Top of Each Other 43
CAUTION: When you use the Phillips screwdriver or power screwdriver to
fasten captive screws on both sides of the module, make sure the captive
force moment is not larger than 0.4 Nom.
Placing Units On
Top of Each Other
If the switch units are free-standing, you can stack up to eight units. If
you are mixing a variety of switches, make sure to place the smaller units
at the top.
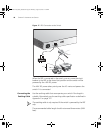
If you are stacking switch units, apply the supplied self-adhesive rubber
feet to the underside of each switch. Stick one in the marked area at each
corner. Place the switch units on top of each other, ensuring that the feet
of the upper unit sit fully on the lower unit.
The Power-up
Sequence
The following sections describe how to prepare your Switch 5500 for
operation.
Powering-up the
Switch 5500
To power-up the switch:
1 Plug the power cord into the power socket at the back of the switch.
2 Plug the other end of the power cord into your power outlet.
The switch powers-up and runs through its Power On Self Test (POST),
which takes approximately one minute.
Checking for Correct
Operation of LEDs
During the POST, all ports on the switch are disabled and the LEDs blink in
a rapid sequence.
When the POST has completed, check the Unit Status to make sure that
your switch is operating correctly.
Table 17 describes the possible LED
colors.
10014925-AD_S5500_GSG.book Page 43 Thursday, August 16, 2007 12:29 PM


Find Your Products By Category
- Photography
- Video Game
- Computer Equipment
- TV and Video
- Communications
- Automotive
- Portable Media
- Marine Equipment
- Cell Phone
- Baby
- Home Audio
- Fitness & Sports
- Power Tools
- Household Appliance
- Car Audio and Video
- Personal Care
- Kitchen Appliance
- Lawn and Garden
- Musical Instruments & Equipment
- Laundry Appliance
- Outdoor Cooking
Please Login
