
0
Owner's of the Axis Communications Security Camera Axis Communications Security Camera gave it a score of 0 out of 5. Here's how the scores stacked up:
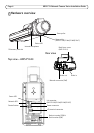

AXIS P13 Network Camera Series Installation Guide Page 9
ENGLISH
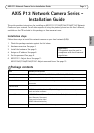
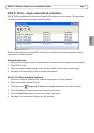
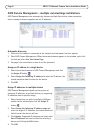
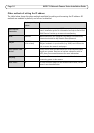
Set the password
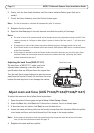
To gain access to the product, the password for the default administrator user root must be set. This
is done in the ‘Configure Root Password’ dialog, which is displayed when the network camera is
accessed for the first time.
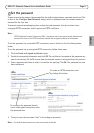
To prevent network eavesdropping when setting the root password, this can be done via an
encrypted HTTPS connection, which requires an HTTPS certificate.
Note:
HTTPS (Hypertext Transfer Protocol over SSL) is a protocol used to encrypt the traffic between web
browsers and servers. The HTTPS certificate controls the encrypted exchange of information.
To set the password via a standard HTTP connection, enter it directly in the first dialog shown
below.
To set the password via an encrypted HTTPS connection, follow these steps:
1. Click the Create self-signed certificate button.
2. Provide the requested information and click OK. The certificate is created and the password can
now be set securely. All traffic to and from the network camera is encrypted from this point on.
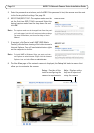
3. Enter a password and then re-enter it to confirm the spelling. Click OK. The password has now
been configured.
4. To log in, enter the user name “root” in the dialog as requested.
Note:
The default administrator user name root cannot be deleted.
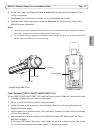
To configure the password directly
via an unencrypted connection, enter
the password here.
To create an HTTPS connection, start
by clicking this button.


Find Your Products By Category
- Photography
- Video Game
- Computer Equipment
- TV and Video
- Communications
- Automotive
- Portable Media
- Marine Equipment
- Cell Phone
- Baby
- Home Audio
- Fitness & Sports
- Power Tools
- Household Appliance
- Car Audio and Video
- Personal Care
- Kitchen Appliance
- Lawn and Garden
- Musical Instruments & Equipment
- Laundry Appliance
- Outdoor Cooking
Please Login
