

0
Owner's of the Lowrance electronic Marine GPS System Lowrance Electronics Marine GPS System gave it a score of 0 out of 5. Here's how the scores stacked up:


1
Transducer Installation
Preparations
Y
ou can install the sonar in some other order if you prefer, but we rec-
ommend this installation sequence:
Caution:
You should read over this entire installation section before drill-
ing any holes in your vehicle or vessel!
1. Determine the approximate location for the sonar/GPS unit, so you
can plan how and where to route the cables for the transducer and
power. This will help you make sure you have enough cable length for
the desired configuration.
2. Determine the approximate location for the transducer and its cable
route.
3. Determine the location of your battery or other power connection,
along with the power cable route.
4. Install the transducer and route the transducer cable to the so-
nar/GPS unit.
6. Install the power cable and route it to the sonar/GPS unit.
7. Mount the sonar/GPS unit to the bracket.
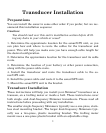
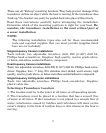
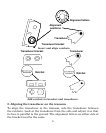
Transducer Installation
These instructions will help you install your Skimmer
®
transducer on a
transom, on a trolling motor or inside a hull. These instructions cover
both single- and dual-frequency Skimmer transducers. Please read all
instructions before proceeding with any installation.
The smaller single-frequency Skimmers typically use a one-piece, stain-
less steel mounting bracket. The larger dual-frequency Skimmers typi-
cally use a two-piece, plastic mounting bracket. The trolling motor
mount uses a one-piece plastic bracket with an adjustable strap.


Find Your Products By Category
- Photography
- Video Game
- Computer Equipment
- TV and Video
- Communications
- Automotive
- Portable Media
- Marine Equipment
- Cell Phone
- Baby
- Home Audio
- Fitness & Sports
- Power Tools
- Household Appliance
- Car Audio and Video
- Personal Care
- Kitchen Appliance
- Lawn and Garden
- Musical Instruments & Equipment
- Laundry Appliance
- Outdoor Cooking
Please Login
