

0
Owner's of the Lowrance electronic Marine GPS System Lowrance Electronics Marine GPS System gave it a score of 0 out of 5. Here's how the scores stacked up:


5
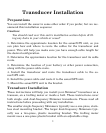
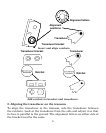
The following instructions sometimes vary depending on the mountin
g
bracket that came with your transducer. Single-frequency Skimmers come
with a one-piece stainless steel bracket, while dual-frequency Skimmers
come with a two-piece plastic mounting bracket. Use the set of instruc-
tions that fits your model.
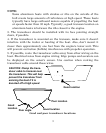
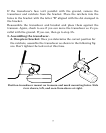
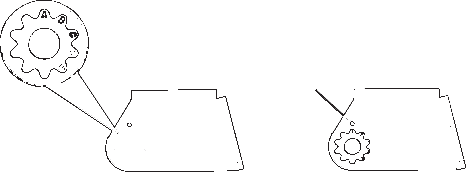
1. Assembling the bracket.
A. One-piece bracket: Press the two small plastic ratchets into the
sides of the metal bracket as shown in the following illustration. Notice
there are letters molded into each ratchet. Place each ratchet into the
bracket with the letter "A" aligned with the dot stamped into the metal
bracket. This position sets the transducer's coarse angle adjustment for a
14° transom. Most outboard and stern-drive transoms have a 14° angle.
Align plastic ratchets in bracket.
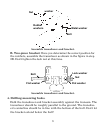
B. Two-piece bracket: Locate the four plastic ratchets in the trans-
ducer's hardware package. Press two ratchets into the sides of the plas-
tic bracket and two on either side of the transducer as shown in the fol-
lowing illustrations. Notice there are letters molded into each ratchet.
Place the ratchets into the bracket with the letter "A" aligned with the
alignment mark molded into the bracket. Place the ratchets onto the
transducer with the letter "A" aligned with the 12 o'clock position on
the transducer stem. These positions set the transducer's coarse angle
adjustment for a 14° transom. Most outboard and stern-drive transoms
have a 14° angle.
Dot


Find Your Products By Category
- Photography
- Video Game
- Computer Equipment
- TV and Video
- Communications
- Automotive
- Portable Media
- Marine Equipment
- Cell Phone
- Baby
- Home Audio
- Fitness & Sports
- Power Tools
- Household Appliance
- Car Audio and Video
- Personal Care
- Kitchen Appliance
- Lawn and Garden
- Musical Instruments & Equipment
- Laundry Appliance
- Outdoor Cooking
Please Login
