

0
Owner's of the Axis Communications Security Camera Axis Communications Security Camera gave it a score of 0 out of 5. Here's how the scores stacked up:

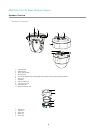


AXIS P5512-E PTZ Dome Network Camera
Accessing the Product
Accessing the Product
To install the Axis product, refer to the Installation Guide supplied with the product.
The product can be used with most operating systems and browsers. The recommended browsers are Internet Explorer with Windows,
Safari with Macintosh and Firefox with other operating systems. See Technical Specications, on page 51.
To view streaming video in Internet Explorer, allow installation of AXIS Media Control (AMC) when prompted.
The Axis product includes one (1) H.264 decoder license for viewing video streams. The license is automatically installed with AMC.
The administrator can disable the installation of the decoders, to prevent installation of unlicensed copies.
Note
• QuickTime
TM
is also supported for viewing H.264 streams.
• If your computer restricts the use of additional software components, the product can be congured to use a Java applet
for viewing Motion JPEG.
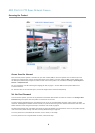
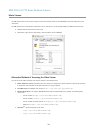
Access from a Browser
1. Start a browser (Internet Explorer, Firefox, Safari).
2. Enter the IP address or host name of the Axis product in the browser’s Location/Address eld. To access the product from a
Macintosh computer (Mac OS X), click on the Bonjour tab and select the product from the drop-down list.
If you do not know the IP address, use AXIS IP Utility to locate the product on the network. For information about how to
discover and assign an IP address, see the Installation and Management Software CD or the document Assign an IP Address
and Access the Video Stream on Axis Support web at www.axis.com/techsup
3. Enter your user name and password. If this is the rst time the product is accessed, the root password must rst be
congured. For instructions, see Set the Root Password, on page 8 .
4. The product’s Live View page opens in your browser.
Note
The controls and layout of the Live View page may have been customized to meet specic installation requirements and
user preferences. Consequently, some of the examples and functions featured here may differ from those displayed in
your own Live View page.
7


Find Your Products By Category
- Photography
- Video Game
- Computer Equipment
- TV and Video
- Communications
- Automotive
- Portable Media
- Marine Equipment
- Cell Phone
- Baby
- Home Audio
- Fitness & Sports
- Power Tools
- Household Appliance
- Car Audio and Video
- Personal Care
- Kitchen Appliance
- Lawn and Garden
- Musical Instruments & Equipment
- Laundry Appliance
- Outdoor Cooking
Please Login
