
0
Owner's of the Axis Communications Security Camera Axis Communications Security Camera gave it a score of 0 out of 5. Here's how the scores stacked up:

AXIS P5512-E PTZ Dome Network Camera
PTZ (Pan Tilt Zoom)
Gatekeeper
The Advanced Gatekeeper monitors an area such as an entrance gate. When motion is detected in the monitored area, the Gatekeeper
will steer the camera to a selected preset position. Using a zoomed-in preset position can make it possible to, for example, read a
license plate or identify a person. When motion is no longer detected, the camera returns to its Home position after a dened time.
To enable the Gatekeeper, go to PTZ > Gatekeeper and follow the online instructions.
It is also possible to, for example, record video or save images (take a snapshot) while the Gatekeeper is active. Go to Events
and set up an action rule with PTZ Preset Reached as trigger.
Guard Tour
A guard tour displays the video stream from different preset positions, one-by-one, in a predetermined order or at random and for
congurable time periods. The enabled guard tour will keep running after the user has logged off or closed the browser.
To add a guard tour:
1. Go to PTZ > Guard Tour and click Add.
2. Enter a descriptive name.
3. Specify the pause length between runs.
4. Select an available preset position and click Apply.
5. Specify the Move Speed.
6. Specify the View Time in seconds or minutes.
7. Specify the View Order or select the Random view order option.
8. Click Save.
To modify or remove guard tours, go to PTZ > Guard Tour, select the guard tour in the Guard Tour List and click Modify/Remove.
For more information see the online help
.
Note
This Axis product supports limited guard tours. The pause between successive guard tours must be set to at least 10 minutes.
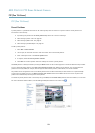
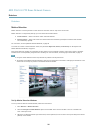
OSDI Zones
On-Screen Direction Indicator (OSDI) zones can be included in the overlay text (see Overlay, on page 19) to aid the user to navigate
the Axis product. Each OSDI zone is set up with coordinates and a descriptive name.
OSDI zones are set up under PTZ > OSDI Zones. The Axis product uses the coordinates of the center of the view to set the lower
left and upper right zone areas. First navigate to where you would like the lowermost left point of the OSDI zone to be located.
Click Get to set the coordinates. Proceed to where the upper right point of zone should be located and click Get. Give the zone a
descriptive name and click OK.
To include the name of the OSDI zone in the overlay text, go to Video < Video Stream < Overlay Settings. Check the Include
text box and enter the modier #L in the eld. For more information about modiers, see File Naming & Date/Time Formats in
the online help
.
24


Find Your Products By Category
- Photography
- Video Game
- Computer Equipment
- TV and Video
- Communications
- Automotive
- Portable Media
- Marine Equipment
- Cell Phone
- Baby
- Home Audio
- Fitness & Sports
- Power Tools
- Household Appliance
- Car Audio and Video
- Personal Care
- Kitchen Appliance
- Lawn and Garden
- Musical Instruments & Equipment
- Laundry Appliance
- Outdoor Cooking
Please Login
