

0
Owner's of the Axis Communications Security Camera Axis Communications Security Camera gave it a score of 0 out of 5. Here's how the scores stacked up:

AXIS P3344 Fixed Dome Network Camera
Video and Audio
Focus & Zoom
Focus and zoom should only be configure d when installing or reinstalling the product. For installation instructions, refer to the
product’s Installation Guide.
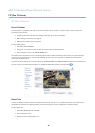
To set focus and zoom:
1. Install the camera as described in the Installation Guide.
2. Go to Video & Audio > Focus & Zoom.
3. On the Basic tab, set the zoom level using the slider. The buttons < and > move the zoom position one step in either
direction. The buttons << and >> move the zoom position in multiple steps in either direction.
4. Click Perform auto focus to focus the camera automatically.
5. If more adjustments are needed, go to the Advanced tab.
Note
• Changing the zoom level moves the focus position. Focus should always be adjusted after changing the zoom.
• Movements in front of the camera should be avoided during automatic focusing.
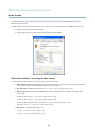
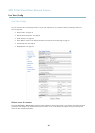
The Pixel counter shows the number of pixels in an area of the image and can be used to ensure that the size of the image
fulfills certain requirements, for exam ple for face recognition. Use the mouse to move a nd resize the pixel counter, or enter the
number o f pixels in the Width and Height fields and click Apply.
On the Advanced tab, focus can be adjusted manually:
1. Click Open iris to open the iris to its m ax imum position. This gives the smallest depth of field and provides the best
conditions for focusing.
2. FocusissetintheFocus window. Use the mouse to move and resize the focus window.
3. Set the zoom level using the slider and click Perform a uto focus to focus the camera automatically.
4. Click in the Focus position bar to focus on a desired location. The buttons < and > move the focus position one step in
either direction. The buttons << and >> move the focus position in multiple steps in either d irection.
5. When satisfied, click Enable iris to enable the iris.
Audio Settings
The audio functionality for each video stream is enabled under Video & Audio > Video Stream > Audio.
Audio Channels
Select the type of audio transmission from the Audio mode: drop-down list (Video & Audio> Audio Settings). The different types a re:
Full duplex - Simultaneous two-way audio allowing you to transmit and receive audio (talk and listen) at the same time. There is no
echo cancellation; if feedback loops appear, try moving the microphone or the speaker.
Half-duplex - Audio can be transmitted in both directions between the Axis product and the client computer, but only in one
direction a t a time. You must actively receive sound using the Talk/Listen button visible in the Live View page (see AXIS Media
Control viewer toolbar). In Push-To-Talk mode, click and hold the button to speak and release it when done. In Toggle mode, click
once to switch between speaking and listening. The Talk/Listen mode is configured fro m the Audio tab in the AMC control panel
(see AXIS Media Control on page 13).
Simplex - Network C amera speaker only - Audio is transmitted from the client to the Axis product and played by the speaker
connected to the product. To send audio, the Talk and Microphone buttons in the AMC toolbar must both be enabled. Click either
button to stop audio transmissio n.
21


Find Your Products By Category
- Photography
- Video Game
- Computer Equipment
- TV and Video
- Communications
- Automotive
- Portable Media
- Marine Equipment
- Cell Phone
- Baby
- Home Audio
- Fitness & Sports
- Power Tools
- Household Appliance
- Car Audio and Video
- Personal Care
- Kitchen Appliance
- Lawn and Garden
- Musical Instruments & Equipment
- Laundry Appliance
- Outdoor Cooking
Please Login
