

0
Owner's of the HTC Cell Phone HTC Touch Pro 2 Cell Phone gave it a score of 0 out of 5. Here's how the scores stacked up:


76 Exchanging Messages
6.3 Email
You can set up the following types of email accounts on your phone:
Outlook email that you sync with your computer or the Exchange Server.
Email account that you have from an Internet Service Provider (ISP) or other email provider.
Web-based email accounts such as Yahoo!® Mail Plus, AOL®, and others.
Custom domain email accounts. The email domain name is hosted by a different email provider. For
more information, search for “custom domain email” in the Help on your phone.
Work account that you access using a VPN connection.
Synchronizing Outlook email with your computer
If you have installed the synchronization software on your computer and created a partnership with your
phone, then your phone is ready to send and receive Outlook email.
If you have not yet installed the synchronization software nor created a partnership, do so by following the
procedures in Chapter 5.
Tip To set up your company email account so that you can access Outlook email messages wirelessly, you must set up
your phone to sync via an over-the-air connection with your company’s Exchange Server. For more information
about synchronizing with your company email server, see Chapter 7.
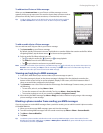
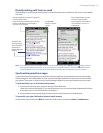
Setting up an Internet email account
Use Windows Mobile’s E-mail Setup Wizard to set up a POP3 or IMAP4 email account on your phone if you
have an email account from an Internet service provider (ISP) or other email service provider, or a web-based
account such as Yahoo! Mail Plus or AOL. You can also add a work account that you access using a VPN server
connection as a POP3/IMAP4 account.
Note You can also set up an Internet email account from the Home screen Mail tab using the simplified Mail Setup. See
“Mail” in Chapter 3 for details.
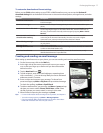
Tap Start > E-mail > Setup E-mail.
Enter your E-mail address and the Password for your email account and select the Save password
option. Tap Next.
If email provider settings are found preconfigured on your phone, the E-mail Setup wizard shows a
successful message. Tap Next.
If the settings are not found on your phone, select the Try to get e-mail settings automatically from
the Internet check box to find and download email server settings from the Internet and then tap Next.
Note You may be charged when your phone connects to the Internet and downloads the email server settings.
Enter Your name and the Account display name and then tap Next.
Note If the E-mail Setup wizard was unsuccessful in finding and downloading settings from the Internet, select
Internet e-mail from the Your e-mail provider list on the next screen. You will be asked to enter email server
settings. See “To specify email server settings” for details.
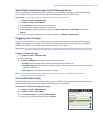
In the Automatic Send/Receive list, choose how often you want email messages to be automatically
sent and downloaded on your phone.
Note Tap Review all download settings to select download options, set the email format as HTML or plain text,
and more. For more information, see “To customize download and format settings."
Tap Finish.
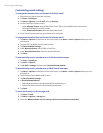
To specify email server settings
If Auto Setup is unsuccessful, contact your ISP or email provider for the Incoming mail server and Outgoing
mail server settings so you can enter them on your phone.
Other options that you can select include the following:
Select the Outgoing server requires authentication check box, if required by your provider.
If the outgoing email server requires a different user name and password for sending email, clear the
Use the same user name and password for sending e-mail check box. You will be prompted to enter
this information.
Tap Advanced Server Settings, then select the Require SSL check boxes if your email provider uses an
SSL connection for more secured email. From the Network connection list, select the data connection
that you use for connecting to the Internet.
•
•
•
•
•
1.
2.
3.
4.
5.
6.
•
•
•


Find Your Products By Category
- Photography
- Video Game
- Computer Equipment
- TV and Video
- Communications
- Automotive
- Portable Media
- Marine Equipment
- Cell Phone
- Baby
- Home Audio
- Fitness & Sports
- Power Tools
- Household Appliance
- Car Audio and Video
- Personal Care
- Kitchen Appliance
- Lawn and Garden
- Musical Instruments & Equipment
- Laundry Appliance
- Outdoor Cooking
Please Login
