

0
Owner's of the HTC Cell Phone HTC Touch Pro 2 Cell Phone gave it a score of 0 out of 5. Here's how the scores stacked up:


Getting Started 19
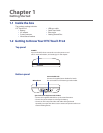
1.3 Installing the Battery and Storage Card
You need to remove the back cover before you can install the battery and storage card. Also, make sure to
always turn off the power before installing or replacing the battery.
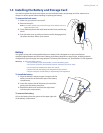
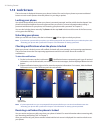
To remove the back cover
Make sure your phone is turned off.
Remove the stylus.
Note You need to temporarily remove the stylus to be able to remove or
replace the back cover.
Firmly hold the phone with both hands and the front panel facing
down.
Push the back cover up with your thumbs until it disengages from
the phone and then slide it up to remove.
1.
2.
3.
4.
Battery
Your phone comes with a rechargeable Lithium-ion battery and is designed to use only manufacturer-
specified original batteries and accessories. Battery performance depends on many factors, including network
configuration, signal strength, and usage patterns. For battery life estimates, see “Specifications” in the Appendix.
Warning! To reduce risk of fire or burns:
• Do not attempt to open, disassemble, or service the battery pack.
• Do not crush, puncture, short external contacts, or dispose of in fire or water.
• Do not expose to temperatures above 60°C (140°F).
• Replace only with the battery pack designated for this product.
• Recycle or dispose of used battery as stipulated by local regulations.
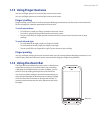
To install the battery
Align the battery’s exposed copper contacts with the
battery connectors at the bottom part of the battery
compartment.
Insert the contacts side of the battery first and then
gently push the battery into place.
Replace the back cover and insert the stylus back
into the stylus compartment.
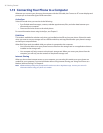
To remove the battery
Lift out the battery from the groove at the upper right side
of the battery compartment.
1.
2.
3.
RESET
Groove


Find Your Products By Category
- Photography
- Video Game
- Computer Equipment
- TV and Video
- Communications
- Automotive
- Portable Media
- Marine Equipment
- Cell Phone
- Baby
- Home Audio
- Fitness & Sports
- Power Tools
- Household Appliance
- Car Audio and Video
- Personal Care
- Kitchen Appliance
- Lawn and Garden
- Musical Instruments & Equipment
- Laundry Appliance
- Outdoor Cooking
Please Login
