
0
Owner's of the Casio Watch Casio Sgw400h-1bv Wrist Watch gave it a score of 0 out of 5. Here's how the scores stacked up:

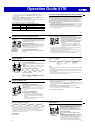
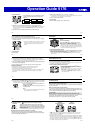

Operation Guide 5176
E-40
• Before the city code starts to fl ash, the message SET Hold will appear on the
display. Keep
A
depressed until SET Hold disappears and the city code
starts to fl ash.
2. Keep pressing
C
until
TEMP
(temperature),
ALTI
(altitude), or
BARO
(barometric
pressure) appears in the left corner of the screen.
• See step 3 under “To change the current time and date settings” (page E-18) for
information about how to scroll through setting screens.
3. Perform the operations below to specify the units you want.
To specify this unit: Press this key: To toggle between these settings:
Temperature
D
°C
(Celsius) and
°F
(Fahrenheit)
Altitude
D
m
(meters) and
ft
(feet)
Barometric Pressure
D
hPa
(hectopascals) and
inHg
(inches of mercury)
4. After the settings are the way you want, press
A
to exit the setting screen.
E-41
Precautions Concerning Simultaneous Measurement of Altitude and Temperature
Though you can perform altitude and temperature measurements at the same time,
you should remember that each of these measurements requires different conditions
for best results. With temperature measurement, it is best to remove the watch from
your wrist in order to eliminate the effects of body heat. In the case of altitude
measurement, on the other hand, it is better to leave the watch on your wrist, because
doing so keeps the watch at a constant temperature, which contributes to more
accurate altitude measurements.
• To give altitude measurement priority, leave the watch on your wrist or in any other
location where the temperature of the watch is kept constant.
• To give temperature measurement priority, remove the watch from your wrist and
allow it to hang freely from your bag or in another location where it is not exposed
to direct sunlight. Note that removing the watch from your wrist can affect pressure
sensor readings momentarily.
E-42
Checking the Current Time in a Different Time Zone
You can use the World Time Mode to view the current
time in one of 31 time zones (48 cities) around the globe.
The city that is currently selected in the World Time Mode
is called the “World Time City”.
To enter the World Time Mode
Use
C
to select the World Time Mode (
WT
) as shown on
page E-10.
•
WT
will appear on the display for about one second.
Next, the display will change to show the city code of
the currently selected World Time City.
To view the time in another time zone
In the World Time Mode, use
D
(East) to scroll through
city codes.
Currently selected
World Time City
Current time in the
currently selected
World Time City
Current Timekeeping
Mode time
Currently selected
World Time City
Current time in the
currently selected
World Time City
Current Timekeeping
Mode time
E-43
To specify standard time or daylight saving time (DST) for a city
1. In the World Time Mode, use
D
(East) to display the
city code (time zone) whose Standard Time/Daylight
Saving Time setting you want to change.
2. Hold down
A
until
DST Hold
appears on the display
and then disappears. Release
A
after
DST Hold
disappears.
• This toggles the city code you selected in step 1
between Daylight Saving Time (DST indicator
displayed) and standard time (DST indicator not
displayed).
• You cannot use the World Time Mode to change the current standard time/
daylight saving time (DST) setting of the Home City.
• Note that you cannot switch between standard time/daylight saving time (DST)
while UTC is selected as the World Time City.
• Note that the standard time/daylight saving time (DST) setting affects only the
currently selected time zone. Other time zones are not affected.
DST indicatorDST indicator
E-44
Using the Stopwatch
The stopwatch measures elapsed time, split times, and two fi nishes.
To enter the Stopwatch Mode
Use
C
to select the Stopwatch Mode (
STW
) as shown on
page E-10.
•
STW
will appear on the display for about one second.
Next, the display will change to show the stopwatch
hours.
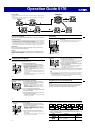
To perform an elapsed time operation
D
D D D A
Start Stop (Restart) (Stop) Reset
To pause at a split time
D
A A D A
Start Split
(
SPL
displayed)
Split release
Stop Reset
1/100 second
Seconds
Minutes
Current timeHours
1/100 second
Seconds
Minutes
Current timeHours
E-45
To measure two fi nishes
D
A
D A
A
Start Split
First runner
fi nishes.
Display time of
fi rst runner
Stop
Second runner
fi nishes.
Split release
Display time of
second runner
Reset
Note
• The Stopwatch Mode can indicate elapsed time up to 23 hours, 59 minutes, 59.99
seconds.
• Once started, stopwatch timing continues until you press
A
to stop it, even if you
exit the Stopwatch Mode to another mode and even if timing reaches the stopwatch
limit defi ned above.
• Exiting the Stopwatch Mode while a split time is frozen on the display clears the
split time and returns to elapsed time measurement.
E-46
Using the Countdown Timer
The countdown timer can be confi gured to start at a preset time, and sound an alarm
when the end of the countdown is reached.
To enter the Countdown Timer Mode
Use
C
to select the Countdown Timer Mode (
TMR
) as
shown on page E-10.
•
TMR
will appear on the display for about one second.
Next, the display will change to show the countdown
time hours.
To specify the countdown start time
1. Enter the Countdown Timer Mode.
• If a countdown is in progress (indicated by the
seconds counting down), press
D
to stop it and
then press
A
to reset to the current countdown
start time.
• If a countdown is paused, press
A
to reset to the
current countdown start time.
Current time
Countdown time
(Hour, minutes,
seconds)
Current time
Countdown time
(Hour, minutes,
seconds)
E-47
2. Hold down
A
until the hour setting of the current countdown start time starts to
fl ash. This is the setting screen.
• Before the hour setting starts to fl ash, the message SET Hold will appear on the
display. Keep
A
depressed until SET Hold disappears and the hour setting
starts to fl ash.
3. Press
C
to move the fl ashing between the hour and minute settings.
4. Use
D
(+) and
B
(–) to change the fl ashing item.
• To set the starting value of the countdown time to 24 hours, set 0H 00’00.
5. Press
A
to exit the setting screen.
E-48
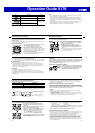
To perform a countdown timer operation
D
D
D D
A
Start Stop (Restart) (Stop) Reset
• Before starting a countdown timer operation, check to make sure that a countdown
operation is not already in progress (indicated by the seconds counting down). If it
is, press
D
to stop it and then
A
to reset to the countdown start time.
• An alarm sounds for fi ve seconds when the end of the countdown is reached. This
alarm will sound in all modes. The countdown time is reset to its starting value
automatically when the alarm sounds.
To stop the alarm
Press any button.
E-49
Using the Alarm
You can set fi ve independent daily alarms. When a daily
alarm is turned on, an alarm tone will sound for about 10
seconds each day when the time in the Timekeeping
Mode reaches the preset alarm time. This is true even if
the watch is not in the Timekeeping Mode.
You can also turn on an Hourly Time Signal, which will
cause the watch to beep twice every hour on the hour.
To enter the Alarm Mode
Use
C
to select the Alarm Mode (
ALM
) as shown on
page E-10.
•
ALM
will appear on the display for about one second.
Next, the display will change to show an alarm number
(
AL1
through
AL5
) or the
SIG
indicator. The alarm
number indicates an alarm screen.
SIG
is shown when
the Hourly Time Signal screen is on the display.
• When you enter the Alarm Mode, the data you were
viewing when you last exited the mode appears fi rst.
Current timeAlarm
number or
SIG
Alarm time
(Hour : Minutes)
Current timeAlarm
number or
SIG
Alarm time
(Hour : Minutes)


Find Your Products By Category
- Photography
- Video Game
- Computer Equipment
- TV and Video
- Communications
- Automotive
- Portable Media
- Marine Equipment
- Cell Phone
- Baby
- Home Audio
- Fitness & Sports
- Power Tools
- Household Appliance
- Car Audio and Video
- Personal Care
- Kitchen Appliance
- Lawn and Garden
- Musical Instruments & Equipment
- Laundry Appliance
- Outdoor Cooking
Please Login
