
3.8
Owner's of the Bell Mobility Aid Bell F20 Speedometer gave it a score of 3.8 out of 5. Here's how the scores stacked up:

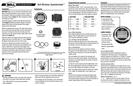
Quickstart (Continued)
current speed. If the current speed is higher than the
average speed, a "+" is displayed on your screen. If the
current speed is lower than the average speed, a "-" is
displayed on the screen. Shows only when SPD function
is on upper screen.
Speed Tendency
"Graphic" is the animation of the wheel moving.
Trip Distance (DST)
Press the Right button until "DST" appears. Trip Distance is
displayed on the lower screen. It is activated automatically
with the bicycle in motion. Trip Distance can be reset by
pressing and holding the Right button for two seconds
when "DST" is displayed on the screen.
NOTE: Resetting Trip Distance will automatically reset Trip
Timer and Average Speed.
Trip Timer (TM)
Trip Timer is displayed on the lower screen. It is activated
automatically with the bicycle in motion: it is on when you
ride and off when you stop. To display the timer, press the
Right button until "TM" appears. The timer records the
total cycling time for each trip. Trip Timer can be reset at
any time by pressing and holding the Left button for two
seconds when the "TM" is displayed on the screen. Note:
Resetting Trip Timer will automatically reset Trip Distance
and Average Speed.
Odometer (ODO)
Odometer is displayed on the lower screen. Just like a car,
it measures distance ridden over time. After changing the
computer battery, ODO will be set to zero. The odometer
can be reset to the previous value by pressing and holding
the Left button for two seconds when "ODO" is displayed
on the screen.
Average Speed (AVS)
Average Speed is displayed on the lower screen. It
represents the average speed while riding. Press the
Right button until the "AVG" appears. The average speed
is measured over the total cycling time for each trip. A
figure can be expressed in Km/hr or M/hr. The average
speed can be reset at any time by pressing and holding
the Right button for two seconds when the AVS is
displayed on the screen.
NOTE: Resetting the Average Speed will automatically
reset the Trip Timer and Trip Distance.
Maximum Speed (MXS)
Press the Right button until the "MXS" appears. This
display will show the maximum speed during your ride.
Maximum Speed can be reset at any time by pressing
and holding the Left button for two seconds when the
MXS is displayed on the screen.
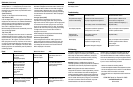
Reset
Trip Reset
Program Reset
Total Reset
Calories Burned (CAL)
Trip Distance (DST)
Trip Timer
Average Speed (AVS)
Clock
Odometer (ODO)
Maximum Speed
Press both main left and
right buttons down for 2
seconds
Above functions plus:
Wheel Circumference
KM or Mile Selection
12-24 Hour Format
KG or LB Selection
User Weight
Clock
Max Speed (MXS)
Odometer Press YELLOW button on
Left back of speedometer
with a pencil tip
All functions, including Odometer
(ODO) are reset (same as when
you change the battery)
Nothing Press RED button on Right
back of speedometer with a
pencil tip
What’s Reset What’s Not Reset How
Hold either left or right main button for more than 1 second to activate the backlight feature & illuminate
the display screen
Problem
No speedometer display
and/or no data reading
Slow display response
Display shows
irregular features
Black display
Possible Cause
Interference from electrical sources
Improper magnet/sensor alignment
Poor battery contact or low/dead battery
Temperature outside of operational
limits (0-60°C or 32-140°F)
Poor battery contact or
low/dead battery
Temperature too hot or display
exposed to sunlight too long
Computer damaged or dropped
Recommended Action
Move computer to different area
Ensure sensor & magnet are
properly installed and aligned (p. 1)
Replace battery
Only use computer when temperature
is within operational limits
Replace battery
Only use computer when temperature
is within operational limits. Remove
from sunlight
Computer is broken
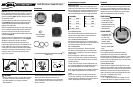
Troubleshooting
Backlight
Reorient or relocate the receiving antenna.
Increase the separation between the equipment & receiver.
Connect the equipment into an outlet on a circuit different
from that to which the receiver is connected.
Consult the dealer or an experienced radio/TV technician
for help.
·
·
·
·
This device complies with Part 15 of the FCC Rules.
Operation is subject to the following two conditions: (1) This
device may not cause harmful interference, and (2) This
device must accept any interference received, including
interference that may cause undesired operation.
Warning: Changes or modifications to this unit not
expressly approved by the party responsible for compliance
could void the user's authority to operate the equipment.
NOTE: This equipment has been tested and found to
comply with the limits for a Class B digital device, pursuant
to Part 15 of the FCC Rules. These limits are designed to
provide reasonable protection against harmful interference
in a residential installation. This equipment generates uses
and can radiate radio frequency energy and, if not installed
and used in accordance with the instructions, may cause
harmful interference to radio communications.
However, there is no guarantee that interference will not
occur in a particular installation. If this equipment does
cause harmful interference to radio or television reception,
which can be determined by turning the equipment off and
on, the user is encouraged to try to correct the interference
by one or more of the following measures:
FCC Warning
©2006 Bell Sports, Inc. Rantoul, IL 61866
www.bellbikestuff.com
Part #115238


Find Your Products By Category
- Photography
- Video Game
- Computer Equipment
- TV and Video
- Communications
- Automotive
- Portable Media
- Marine Equipment
- Cell Phone
- Baby
- Home Audio
- Fitness & Sports
- Power Tools
- Household Appliance
- Car Audio and Video
- Personal Care
- Kitchen Appliance
- Lawn and Garden
- Musical Instruments & Equipment
- Laundry Appliance
- Outdoor Cooking
Please Login
