
3.8
Owner's of the Bell Mobility Aid Bell F20 Speedometer gave it a score of 3.8 out of 5. Here's how the scores stacked up:
Bell Wireless Speedometer
™
Installation
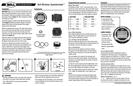
BATTERY Make sure to write down the Odometer value
before changing the battery so you can later re-enter it in
the odometer. Install the new battery with the positive (+)
pole facing outward (Figure 1). After changing the battery
all settings are erased.
Clamp the magnet to a spoke on the right side of the front
wheel (Figure 2). Make sure that the magnet is facing the
outside of the wheel so that the flat side of the magnet
passes in front of the sensor.
Attach the speedometer sensor to the right fork leg using
the two cable ties provided. Make sure the metal side of
the sensor is facing the wheel. Do not fully secure the
cable ties yet, as the sensor location might require further
adjustments (Figure 3).
Adjust the sensor and magnet location so that clearance
between the two is no greater than 1/5" (5mm) (Figure
4). Magnet should pass by the tip of the sensor.
Remove the adhesive tape shield on the back of the
bracket and position the bracket on the handlebar of the
bicycle. Fasten the O-ring around the top edge of the
bracket and wrap around the underside of the handlebar
and attach to the bottom edge of the bracket. Insert the
computer into the mounting bracket and twist to the
right to lock into place.
Sensor
or
Magnet
5mm
Sensor
Magnet
Sensor
Top View
Bicycle fork
Sensor
or
Magnet
5mm
Sensor
Magnet
Sensor
Top View
Bicycle fork
Sensor
or
Magnet
5mm
Sensor
Magnet
Sensor
Top View
Bicycle fork
Sensor
or
Magnet
5mm
Sensor
Magnet
Sensor
Top View
Bicycle fork
Wheel Size Input
The flashing number "2124" is the preset value. To de-
termine the correct wheel factor, refer to the table shown.
Set the wheel factor by pressing the Right button until the
correct setting appears. Press the Left button to lock in
the correct digit. Repeat until all four digits are entered.
Programming the Computer
Road Bike
20" 1596
22" 1759
24" 1916
26" 2073
27"/700c 2124
Mountain Bike
24" 1888
26" 2045
27" 2155
28" 2237
Quickstart
Now that the speedometer is configured, insert the com-
puter into the bracket and twist to the right to lock in place.
To check for proper installation, spin the front wheel. The
speed tendency icon in the upper left corner of the screen
should be turning as the computer starts recording data
(Refer to Troubleshooting in case of problems).
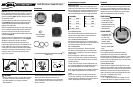
LOWER SCREEN
Trip Distance (DST)
0–999.9 Km or M
Trip Timer (TM)
9 hrs 59 min 59 sec
Odometer (ODO)
Average Speed (AVS)
Maximum Speed (MXS)
Clock
·
·
·
·
·
·
UPPER SCREEN
Current Speed (SPD)
0–199.9 Km/hr or M/hr
Calories Burned (CAL)
0–999.9 Calories Burned
Speed Comparison (+ or -)
Speed Tendency
·
·
·
·
Current Speed (SPD)
Current Speed represents instantaneous speed. It
is displayed on the upper screen. The speedometer
measures speeds up to 200Km/hr or 125 M/hr. If no keys
are touched and no movement sensed from the bicycle
for five minutes, the speedometer will go into sleep mode.
Press any key to reactivate.
Calories Burned (CAL)
Calories Burned is displayed on the upper screen. It rep-
resents the accumulated number of calories burned while
riding. The calorie count on the screen will start over once
999 calories have been burned. Calories Burned can be
reset at any time by pressing and holding the Left button
when "CAL" is displayed on the screen.
Speed Comparison (+ or -)
"+" or "-" appears next to the current speed. This func-
tion shows the positive or negative acceleration of your
WARNING!
Improper installation of this or any other bike computer
can result in an accident. Read instructions carefully.
Call 1-800-456-BELL if you have any questions
about installation.
·
·
Check mounting hardware and transmitter installation
before each ride for adjustment and secure fit.
This computer will not fit all bikes. If you cannot get a
secure installation per the instruction manual, do not
use this computer.
·
·
Sensor
Mounting Bracket
Cable Ties (2)
Magnet
O-Rings (3)
Computer Battery
(3.0V/CR2032)
Computer Unit
Components
Km or Mile Selection
After setting the Wheel Factor the Km/M selection will
appear. Press the Right button to choose kilometer or
mile. Press the Left button to confirm.
12 or 24 Hour Format Selection
After the Km/M input selection, the clock format screen
will appear. Press the Right button to choose between the
two formats. Press the Left button to confirm.
KG or LB Selection
After the hour format selection, the Kg/Lb selection
will appear. Press the Right button to choose between
Kilograms (Kg) or Pounds (Lb). Press the Left button to
confirm choice.
Once the weight unit is selected, the computer will
ask the user to enter his/her weight. This will allow the
computer to accurately estimate the number of calories
burned while riding.
To enter the correct weight, press the Right button until
the correct digit appears. Press the Left button to lock in
the correct digit. Repeat until all digits are entered.
NOTE: The weight entered should be between 80–499Lb
or 35–199Kg. The speedometer is now ready to use.
Clock
Set the time by pressing and holding the Right button
until the hour is flashing. To set, press the Right button
until desired setting is displayed. Press the Left button to
confirm. Repeat steps for the minute setting.
Continued On Reverse Side


Find Your Products By Category
- Photography
- Video Game
- Computer Equipment
- TV and Video
- Communications
- Automotive
- Portable Media
- Marine Equipment
- Cell Phone
- Baby
- Home Audio
- Fitness & Sports
- Power Tools
- Household Appliance
- Car Audio and Video
- Personal Care
- Kitchen Appliance
- Lawn and Garden
- Musical Instruments & Equipment
- Laundry Appliance
- Outdoor Cooking
Please Login
