
0
Owner's of the Axis Communications Security Camera Axis Communications Security Camera gave it a score of 0 out of 5. Here's how the scores stacked up:


AXIS M3007–PV
Video
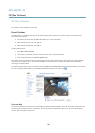
To dene the video stream settings for each view area click on the respective view area from Setup > Video > Video Stream.
See page 15.
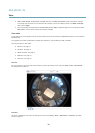
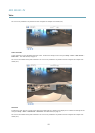
You can select a view area that you have set up from the Source drop-down list in the Live View page. Use the Pan, Tilt, Zoom
sliders, or click on the overview map at the bottom right to zero in on an area. The current position is indicated in the overview
map by a green circle.
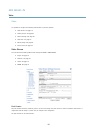
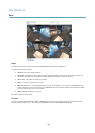
Overlay
Overlays are used to provide extra information, for example for forensic video analysis or during product installation and
conguration. Overlays are superimposed over the video stream.
An overlay text can display the current date and time, or a text string. When using a text string, modiers can be used to display
information such as the current bit rate or the current frame rate. For information about available modiers, see File Naming &
Date/Time Formats in the online help
.
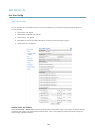
To enable overlays:
1. Go to Video > Video Stream and select the Image tab.
2. To include an overlay image, select Include overlay image at the coordinates. The overlay image must rst be uploaded to
the Axis product, see Overlay Image.
3. To include date and time, select Include date and Include time.
4. To include a text string, select Include text and enter the text in the eld. Modiers can be used, see File Naming &
Date/Time Formats in the online help
.
5. Dene text overlay characteristics in the relevant elds.
6. Click Save.
To modify the date and time format, go to System Options > Date & Time. See Date & Time, on page 41.
Overlay Image
An overlay image is a static image superimposed over the video stream. The image, for example company logo, is used to provide
extra information or to mask a part of the image.
Since it is static, the position and size of an overlay image will remain the same regardless of resolution and Pan/Tilt/Zoom
movements. To set up a dynamic mask, which will always mask the specied part of monitored area, see Privacy Mask, on page 23
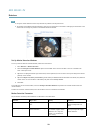
To use an overlay image, the image must rst be uploaded to the Axis product:
1. Go to Video > Overlay Image.
2. Click Browse and browse to the le.
3. Click Upload.
4. Select the image to use from the Use overlay image list.
5. Click Save.
To display the overlay image:
1. Go to Video > Video Stream and select the Image tab.
2. Under Overlay Settings, select Include overlay image at the coordinates and enter the X and Y coordinates.
3. Click Save.
22


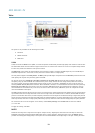
Find Your Products By Category
- Photography
- Video Game
- Computer Equipment
- TV and Video
- Communications
- Automotive
- Portable Media
- Marine Equipment
- Cell Phone
- Baby
- Home Audio
- Fitness & Sports
- Power Tools
- Household Appliance
- Car Audio and Video
- Personal Care
- Kitchen Appliance
- Lawn and Garden
- Musical Instruments & Equipment
- Laundry Appliance
- Outdoor Cooking
Please Login
