Component Checklist
Coach Screw (x4)
Nylon Anchor (x4)
Washer (x4)
5mm/4mm
Allen Key
M6x16mm
M6x25mm
M8x16mm
M8x25mm
Installation Instructions
TH-3060-UFL
Large-Medium TV Articulated Arm
IMPORTANT INFORMATION:
Step 1. Check Components
Check you have received all parts against the Component Checklist and Hardware above.
! IMPORTANT - Install Telehook 3060 Large-Medium TV Articulated Arm per Installation Instructions.
! This product supports a maximum load of 35kg (77lbs).
! This product supports VESA mounting hole configurations 200mm wide x100mm high to 700mm wide x 500mm high.
! The manufacturer accepts no responsibility for incorrect installation.
Display Mounting
Screws (x4 each)
Hardware
Tools Required:
Power drill
•
5mm (0.2”) drill bit
•
10mm (0.39”) masonry drill bit
•
Phillips head screw driver•
13mm (0.5”) socket wrench or shifter
•
Step 2. Changing position of Arm on Wall Mount
Step 3. Install Arm/Wall Mount to the Wall
Arm/Wall Mount
Mounting Bracket (x2)
Multiwasher (x4)
End Cap (x2)
Top Cap (x2)
Block (x2)
Locking
Screw (x4)
End Cap
Use Phillips head screw driver
to loosen and tighten.
Use 5mm Allen Key to
loosen and tighten.
Timber Stud Wall
Masonry Wall
- Drill four 10mm (0.39”) diameter holes, 58mm (2.3”) deep.
- Secure the mounting plate to the wall using the Coach
Screws and Nylon Anchors supplied.
- Drill four 5mm (0.2”) diameter holes, 58mm (2.3”) deep.
- Secure the mounting plate to the wall using the Coach
Screws supplied.
NOTE: Use a stud finder to accurately locate the centre
of the stud. Ensure that all screws fix securely into stud.
Four optional positions
OR
Coach Screw
Washer
End Cap
Screw
Nylon Anchor
Drilled Hole
End Cap
Coach Screw
Washer
End Cap
Screw
Drilled Hole
End Cap
WALL
WALL
Flat screen wall mount | Full Motion height adjustable
TH-3060-UFH
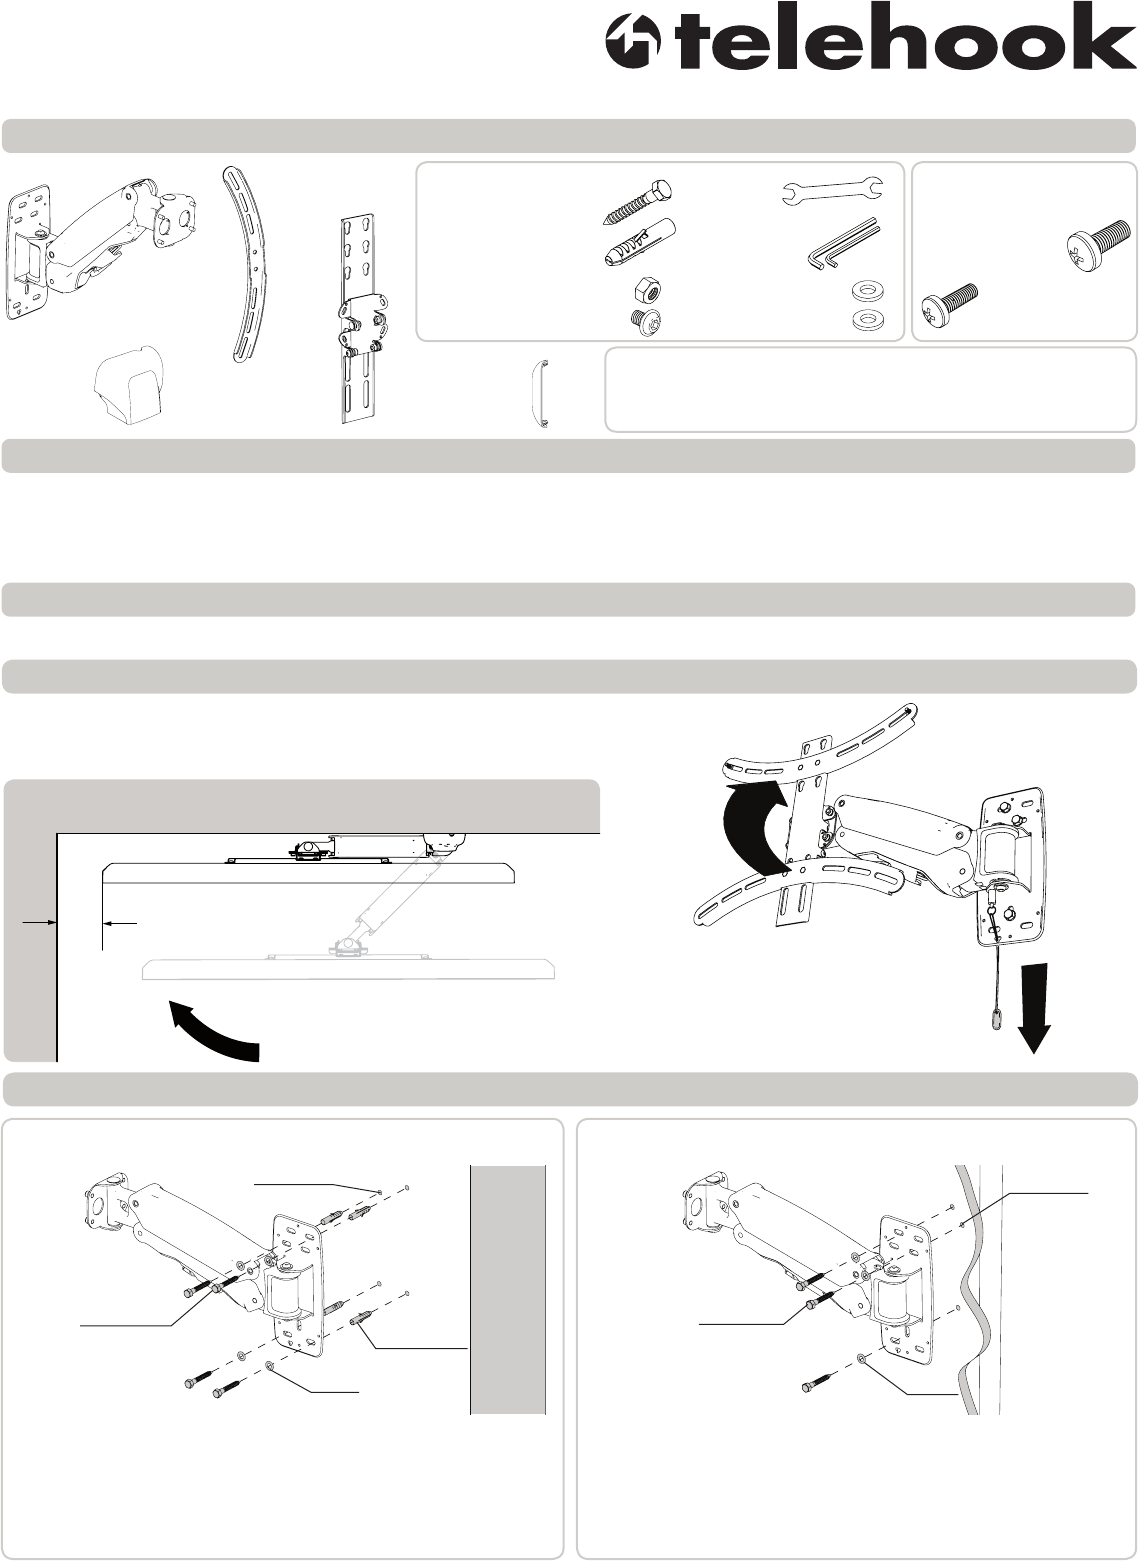
! IMPORTANT - Install Telehook Flatscreen wall mount as per Installation Instructions
! This product supports a minimum load of 5kg (11lbs) and a maximum load of 25kg (55lbs)
! This product supports VESA mounting hole configurations from 200mm x 200mm to 400mm x 400mm
! The Manufacturer accepts no responsibility for incorrect installation.
Check you have received all parts against the Component Checklist and Hardware.
M6 x 16mm (x4)
M6 x 25mm (x4)
Display Mounting
Screws Bag
M8 x 16mm (x4)
M8 x 25mm (x4)
Hardware Bag
Coach Screw (x4)
Nylon Anchor (x4)
Spanner
6mm/4mm
Allen key
20mm Washer (x4)
Arm
Display
Mount
Mount
cap (x2)
Display
Bracket (x2)
Wall plate
cover (x2)
Masonary Wall Timber Stud wall
- Using a 10mm (0.39”) masonary drill bit, Drill four holes,
60mm (2.4”) deep.
- Secure the mounting plate to the wall using the Coach
Screws and Nylon Anchors supplied.
- 5mm (0.2”) drill bit
- 10mm (0.39”) masonary drill bit
- Philips head screwdriver
- Power drill
Tools required:
Clearance
locked position
free movement
M6 Nyloc Nut (x4)
M6 x 6mm screw (x4)
12mm Washer (x4)
Installation Instructions
- Using a 5mm (0.2”) drill bit, Drill three holes , 60mm (2.4”)
deep.
- Secure the mounting plate to the wall using the Coach
Screws supplied.
NOTE: Use a stud finder to accurately locate the centre
of the stud. Ensure that all screws fix securely into stud.
Coach Screw
Washer
Nylon Anchor
Drilled hole
Coach Screw
Washer
Drilled hole
This product has a feature where the arm will automatically lock in position when
pushed up against the wall to the left. If this feature is to be used allow clearance
to the left when deciding the mounting location.
To unlock, pull the chord down whilst
moving the arm away from the wall
Wall
Wall
Step 3. Install Arm to the wall
Step 1. Check Components
Component Checklist
Step 2. Mounting Location
IMPORTANT INFORMATION


