
3.2
Owner's of the PYLE Audio Microphone PDWM4300 gave it a score of 3.2 out of 5. Here's how the scores stacked up:
7
LOW BAT
ON MUTE
MIC/LINE
AUDIO POWER ATTENUATION POWER
OFF ON
0dB
-20dB
9V +
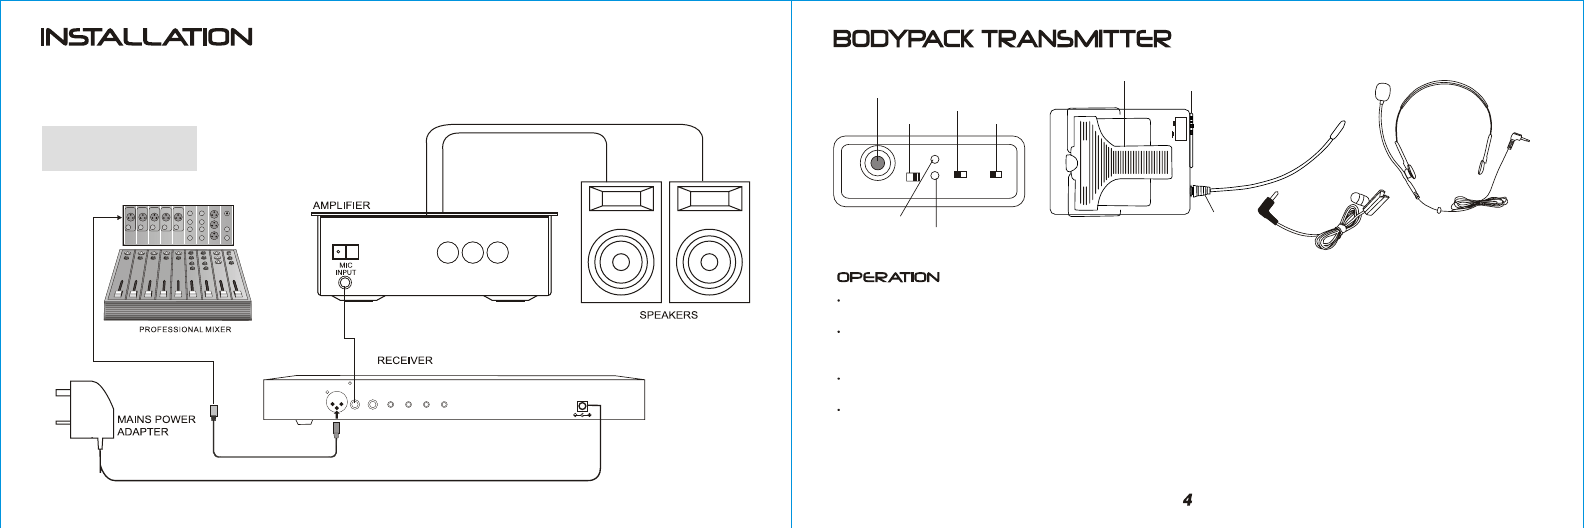
AUDIO OUTPUT JACK
AUDIO SWITCH
VOLUME SWITCH
POWER SWITCH
LOW BATTERY LED
POWER LED
BATTERY COVER
ANTENNA
BELT CLIP
Before operation, please confirm that the frequency of transmitter is same as the frequency of receiver. Plug the 3.5mm connector of headset mic to
screw-lock socket of transmitter. Move the audio switch to ON position.
ATTENUATION is for volume adjustment. Move it to 0dB position to get normal volume output. Move it to -20dB position to reduce distortion and
avoid feedback.
If the system will not be used for a long time, please switch off the transmitter to avoid power consumption.
Open the battery cover to install a 9V battery (check polarities). Move the power switch to the ON position. The to
indicate normal operation. If the LOW BAT indicator turns red, replace with a fresh battery promptly.
The MUTE switch cuts off the audio output without shutting off the
transmitter.
power indicator will be green
HEADSET MIC
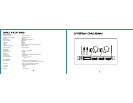
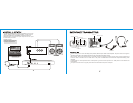
Using the supplied audio cable, connect from the MIXED jack socket to the
"MIC IN" / "LINE IN" socket on amplifier.
Connect the mains power adaptor from "DC 15V" jack to
a suitable mains power socket.
Alternatively, you can connect an
optional XLR cable from the "XLR MIXED" socket on the receiver to a
professional mixer.
Installation Location:
At least 3 ft. above ground level
At Least 3 ft. away from wall
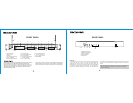
MIC LINE MIC LINE MIC LINE MIC LINE MIC LINE
XLR MIXED
MIXED CH-1 SQ4 SQ3 SQ2 SQ1
DC IN
15V/500mA
LAVALIER MIC


Find Your Products By Category
- Photography
- Video Game
- Computer Equipment
- TV and Video
- Communications
- Automotive
- Portable Media
- Marine Equipment
- Cell Phone
- Baby
- Home Audio
- Fitness & Sports
- Power Tools
- Household Appliance
- Car Audio and Video
- Personal Care
- Kitchen Appliance
- Lawn and Garden
- Musical Instruments & Equipment
- Laundry Appliance
- Outdoor Cooking
Please Login
