
0
Owner's of the Casio Watch Casio Gwm850-1 Watch gave it a score of 0 out of 5. Here's how the scores stacked up:
Operation Guide 3155
5
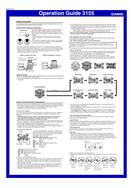
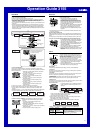
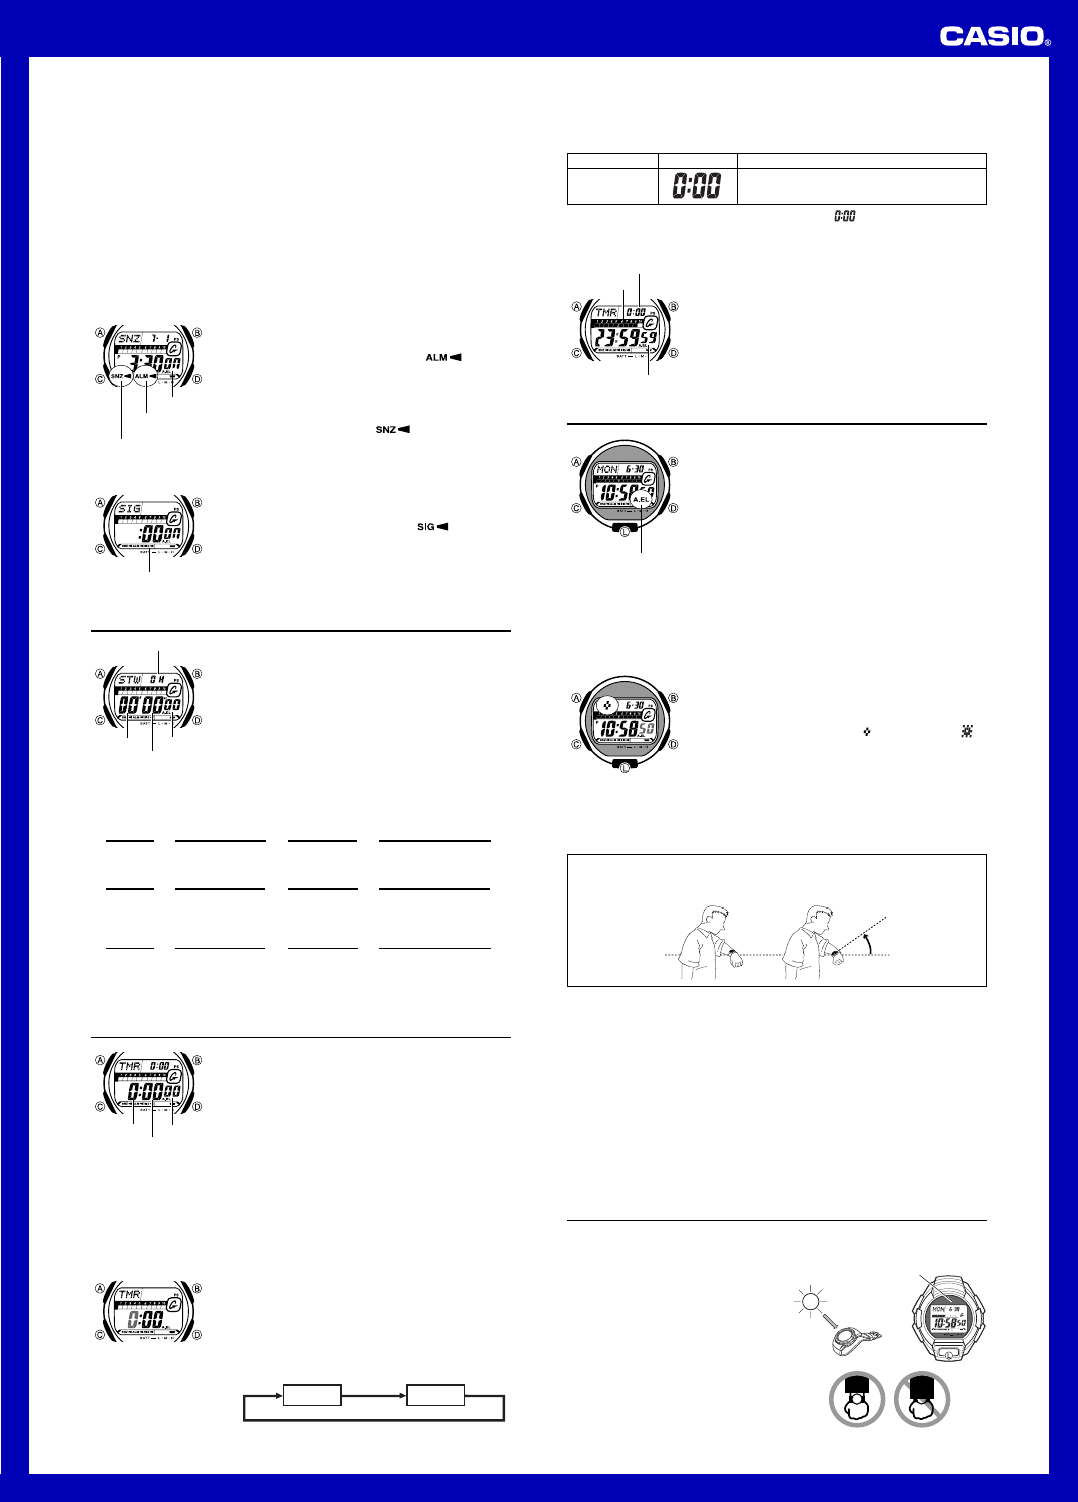
Alarm Operation
The alarm tone sounds at the preset time for 10 seconds, regardless of the mode the
watch is in. In the case of the snooze alarm, the alarm operation is performed a total
of seven times, every five minutes, until you turn the alarm off.
• Alarm and Hourly Time Signal operations are performed in accordance with the
Timekeeping Mode time.
• To stop the alarm tone after it starts to sound, press any button.
• Performing any one of the following operations during a 5-minute interval between
snooze alarms cancels the current snooze alarm operation.
Displaying the Timekeeping Mode setting screen
Displaying the
SNZ
setting screen
To test the alarm
In the Alarm Mode, hold down D to sound the alarm.
To turn an alarm on and off
1. In the Alarm Mode, use D to select an alarm.
2. Press B to toggle it on and off.
• Turning on a alarm (
AL1, AL2, AL3, AL4 or
SNZ) displays the alarm on indicator ( ) on its
Alarm Mode screen.
• In all modes, the alarm on indicator is shown for any
alarm that is currently turned on.
• The alarm on indicator flashes while the alarm is
sounding.
• The snooze alarm indicator (
) flashes while the
snooze alarm is sounding and during the 5-minute
intervals between alarms.
Alarm on
indicator
Snooze alarm
indicator
ON
To turn the Hourly Time Signal on and off
1. In the Alarm Mode, use D to select the Hourly Time
Signal (
SIG).
2. Press B to toggle it on and off.
• The Hourly Time Signal on indicator (
) is shown
on the display in all modes while this function is turned
on.
Hourly time signal
on indicator
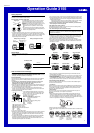
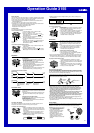
Stopwatch
The stopwatch lets you measure elapsed time, split times,
and two finishes.
• The display range of the stopwatch is 23 hours, 59
minutes, 59.99 seconds.
• The stopwatch continues to run, restarting from zero
after it reaches its limit, until you stop it.
• The stopwatch measurement operation continues even
if you exit the Stopwatch Mode.
• Exiting the Stopwatch Mode while a split time is frozen
on the display clears the split time and returns to
elapsed time measurement.
• All of the operations in this section are performed in the
Stopwatch Mode, which you enter by pressing C.
1/100 second
Hours
Minutes
Seconds
➤ ➤ ➤ ➤
To measure times with the stopwatch
Elapsed Time
Split Time
Two Finishes
D
Start Stop Re-start Stop
DDD
Clear
B
➤ ➤ ➤ ➤
D
Start Split
(SPL displayed)
Split release Stop
BDB
Clear
B
➤ ➤ ➤ ➤
D
Start Split
First runner finishes.
Display time of first
runner.
Stop
Second runner
finishes.
Split release
Display time of
second runner.
DBB
Clear
B
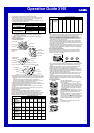
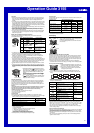
Countdown Timer
You can set the countdown timer within a range of one
minute to 24 hours. An alarm sounds when the countdown
reaches zero.
• All of the operations in this section are performed in the
Countdown Timer Mode, which you enter by pressing
C.
Configuring the Countdown Timer
The following are the settings you should configure before
actually using the countdown timer.
Countdown start time
• See “To configure the countdown timer” for information
about setting up the timer.
Hours
Minutes
Seconds
Countdown End Beeper
The countdown end beeper lets you know when the countdown reaches zero. The
beeper stops after about 10 seconds or when you press any button.
To configure the countdown timer
1.While the countdown start time is on the display in the
Countdown Timer Mode, hold down A until the current
countdown start time starts to flash, which indicates the
setting screen.
• If the countdown start time is not displayed, use the
procedure under “To use the countdown timer” to
display it.
2.Press C to move the flashing in the sequence shown
below to select other settings.
Hours Minutes
l
l
l
l
l
l
l
l
l
l
l
l
l
l
3. When the setting you want to change is flashing, use D and B to change it as
described below.
• To specify a countdown start time of 24 hours, set
.
4. Press A to exit the setting screen.
Button Operation
Use D (+) and B (–) to change the setting.
Setting
Hours, Minutes
Screen
To use the countdown timer
Press D while in the Countdown Timer Mode to start the
countdown timer.
• The countdown timer operation continues even if you
exit the Countdown Timer Mode.
• Press D while a countdown operation is in progress to
pause it. Press D again to resume the countdown.
• To stop a countdown operation completely, first pause it
(by pressing D), and then press B. This returns the
countdown time to its starting value.
l
l
l
l
l
l
l
l
l
l
l
Seconds
Current timer time
Timer start time
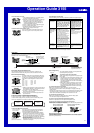
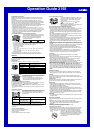
Illumination
This watch has an EL (electro-luminescent) panel that
causes the entire display to glow for easy reading in the
dark. The watch’s auto light switch turns on illumination
automatically when you angle the watch towards your
face.
• The auto light switch must be turned on (indicated by
the auto light switch on indicator) for it to operate.
• See “Illumination Precautions” for other important
information about using illumination.
To illuminate the display manually
In any mode, press L to turn on illumination.
• The above operation turns on illumination regardless of
the current auto light switch setting.
Auto light switch
on indicator
• You can use the procedure below to select either 1.5 seconds or 3 seconds as the
illumination duration. When you press L, the illumination will remain on for about
1.5 seconds or 3 seconds, depending on the current illumination duration setting.
To specify the illumination duration
1. In the Timekeeping Mode, hold down A until the
display contents start to flash. This is the setting screen.
2. Press the C button three times to move the flashing to
the seconds.
3. While the seconds are flashing, press B to toggle the
setting between 1.5 seconds (
) and 3 seconds ( ).
4. Press A to exit the setting screen.
l
l
l
l
l
l
l
l
l
l
l
l
l
l
l
About the Auto Light Switch
Turning on the auto light switch causes illumination to turn on, whenever you position
your wrist as described below in any mode. Note that this watch features a “Full Auto
EL Light,” so the auto light switch operates only when available light is below a certain
level. It does not turn on the backlight under bright light.
Moving the watch to a position that is parallel to the ground and then tilting it towards
you more than 40 degrees causes illumination to turn on.
• Wear the watch on the outside of your wrist.
Parallel to
ground
More than 40°
Warning!
• Always make sure you are in a safe place whenever you are reading the
display of the watch using the auto light switch. Be especially careful when
running or engaged in any other activity that can result in accident or injury.
Also take care that sudden illumination by the auto light switch does not
startle or distract others around you.
• When you are wearing the watch, make sure that its auto light switch is turned
off before riding a bicycle or operating a motorcycle or any other motor
vehicle. Sudden and unintended operation of the auto light switch can create a
distraction, which can result in a traffic accident and serious personal injury.
To turn the auto light switch on and off
In the Timekeeping Mode, hold down L for about three seconds to toggle the auto
light switch on (A.EL displayed) and off (A.EL not displayed).
• The auto light switch on indicator (A.EL) is on the display in all modes while the auto
light switch is turned on.
Power Supply
This watch is equipped with a solar cell and a special rechargeable battery (secondary
battery) that is charged by the electrical power produced by the solar cell. The
illustration shown below shows how you should position the watch for charging.
Example:Orient the watch so its face is
pointing at a light source.
• The illustration shows how to position
a watch with a resin band.
• Note that charging efficiency drops
when any part of the solar cell is
blocked by clothing, etc.
• You should try to keep the watch
outside of your sleeve as much as
possible. Charging is reduced
significantly if the face is covered only
partially.
Solar cell


Find Your Products By Category
- Photography
- Video Game
- Computer Equipment
- TV and Video
- Communications
- Automotive
- Portable Media
- Marine Equipment
- Cell Phone
- Baby
- Home Audio
- Fitness & Sports
- Power Tools
- Household Appliance
- Car Audio and Video
- Personal Care
- Kitchen Appliance
- Lawn and Garden
- Musical Instruments & Equipment
- Laundry Appliance
- Outdoor Cooking
Please Login
