

0
Owner's of the Black & Decker Chainsaw Black & Decker Chainsaw gave it a score of 0 out of 5. Here's how the scores stacked up:
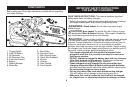

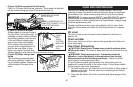

Switch
• Always be sure of your footing
and grip the chain saw firmly
with both hands with the thumb
and fingers encircling both
handles.
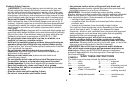
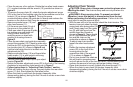
• To turn the tool ON push the lock
off button (2) to either side and
squeeze the trigger switch (1)
with your fingers as shown in
figure N. (Once the tool is running you can release the lock off
button.)
• To turn the tool OFF, release the trigger switch.
Chain Braking System
Your chain saw is equipped with a motor chain braking system which
will stop the chain quickly each time you release the trigger. This
system should be tested before every use.
Saw Chain Sharpness
The cutters will dull immediately if they touch the ground or a nail
while cutting. Refer to “Sharpening the Chain”.
Saw Chain Tension
This should be done regularly. Refer to “Adjusting Chain Tension”.
Common Cutting Techniques
Felling
Felling is the process of cutting down a tree. Be sure battery is
fully charged before felling a tree so you can finish on a single
charge. Do not fell trees in high wind conditions.
Bucking is the process of cutting a felled tree or log into lengths.
When bucking and felling operations are being performed by two
or more persons, at the same time, the felling operation should be
separated from the bucking operation by a distance of at least
twice the height of the tree being felled. Trees should not be felled
in a manner that would endanger any person, strike any utility line
or cause any property damage. If the tree does make contact with
any utility line, the utility company should be notified immediately.
Scrutinize the surrounding overhead for dead or broken limbs or
branches which may fall during the felling process.
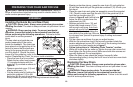
The chain saw operator should keep on the uphill side of the
terrain as the tree is likely to
roll or slide downhill after it is
felled.
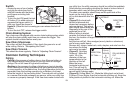
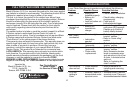
• (Figure O) A retreat path
should be planned and
cleared as necessary before
cuts are started. The retreat
path should extend back and
diagonally to the rear of the
expected line of fall.
• Before felling is started,
consider the natural lean of
the tree, the location of larger branches and the winddirection to
judge which
way the tree will fall. Have wedges (wood, plastic or aluminum)
and a heavy mallet handy.
Remove dirt, stones, loose bark, nails, staples, and wire from the
tree where the felling
cuts are to be made.
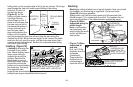
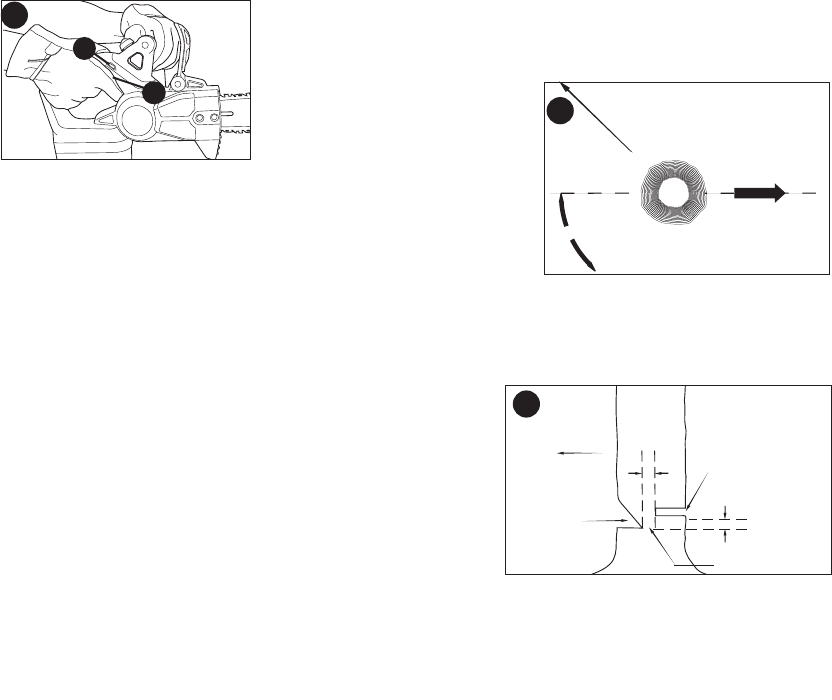
• (Figure P) Notching
Undercut - Make the
notch 1/3 of the
diameter of the tree,
perpendicular to the
direction of the fall.
Make the lower
horizontal notching cut
first. This will help to
avoid pinching of either the saw chain or the guide bar when the
second notch is being made.
• (Figure Q) Felling Back Cut - Make the felling back cut at least
2 inches (51mm) higher than the horizontal notching cut. Keep the
felling back cut parallel to the horizontal notching cut. Make the
N
P
O
2 (5cm)
INCHES
DIRECTION
OF FALL
2 (5cm)
INCHES
HINGE
NOTCH
FELLING BACK
CUT
DIRECTION
OF
FALL
RETREAT
45°
TREE
2
1
13


Find Your Products By Category
- Photography
- Video Game
- Computer Equipment
- TV and Video
- Communications
- Automotive
- Portable Media
- Marine Equipment
- Cell Phone
- Baby
- Home Audio
- Fitness & Sports
- Power Tools
- Household Appliance
- Car Audio and Video
- Personal Care
- Kitchen Appliance
- Lawn and Garden
- Musical Instruments & Equipment
- Laundry Appliance
- Outdoor Cooking
Please Login
