

0
Owner's of the Axis Communications Security Camera AXIS Network Camera gave it a score of 0 out of 5. Here's how the scores stacked up:


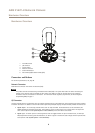


AXIS P1427–E Network Camera
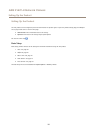
Accessing the Product
The default administrator user name root is permanent and cannot be deleted. If the password for root is lost, the product must be
reset to the factory default settings. See Reset to Factory Default Settings on page 51.
To set the password via a standard HTTP connection, enter it directly in the dialog.
To set the password via an encrypted HTTPS connection, follow these steps:
1. Click Use HTTPS.
A temporary certicate (valid for one year) is created, enabling encryption of all trafc to and from the product, and the
password can now be set securely.
2. Enter a password and then re-enter it to conrm the spelling.
3. Click OK. The password has now been congured.
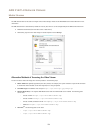
Congure Capture Mode
Capture mode denes the maximum resolution and maximum frame rate available in the Axis product. The capture mode setting also
affects the camera’s angle of view.
Select the desired capture mode from the drop-down list and click OK.
See also Capture Mode on page 18.
Set Power Line Frequency
Power line frequency is set the rst time the Axis product is accessed and can only be changed from Plain Cong (see page 51)
or by resetting the product to factory default.
Select the power line frequency (50 Hz or 60 Hz) used at the location of the Axis product. Selecting the wrong frequency may cause
image icker if the product is used in uorescent light environments.
When using 50 Hz, the maximum frame rate is limited to 25 fps.
Note
Power line frequency varies depending on geographic region. The Americas usually use 60 Hz, whereas most other parts of
the world use 50 Hz. Local variations could apply. Always check with the local authorities.
The Live View Page
The controls and layout of the Live View page may have been customized to meet specic installation requirements and user
preferences. Consequently, some of the examples and functions featured here may differ from those displayed in your own Live View
page. The following provides an overview of each available control.
Controls on the Live View Page
Click the View size buttons to show the image in full size (right button) or to scale down the image to t the
browser window (left button).
Select a stream prole for the Live View page from the Stream Prole drop-down list. For information about how
to congure stream proles, see page 17.
Click Pulse to activate the product’s output port for a dened period of time. For information about how to
enable and congure output buttons, see page 25.
9


Find Your Products By Category
- Photography
- Video Game
- Computer Equipment
- TV and Video
- Communications
- Automotive
- Portable Media
- Marine Equipment
- Cell Phone
- Baby
- Home Audio
- Fitness & Sports
- Power Tools
- Household Appliance
- Car Audio and Video
- Personal Care
- Kitchen Appliance
- Lawn and Garden
- Musical Instruments & Equipment
- Laundry Appliance
- Outdoor Cooking
Please Login
