
0
Owner's of the Axis Communications Car Video System Axis Communications Car Video System gave it a score of 0 out of 5. Here's how the scores stacked up:


AXIS M7001 Installation Guide Page 5
ENGLISH
Install the hardware
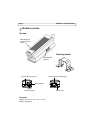
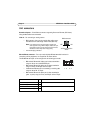
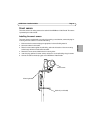
Mount the video encoder to a wall/ceiling
The video encoder is supplied with a mounting kit containing a metal bracket, screws and plugs for
mounting the video encoder to a concrete wall/ceiling:
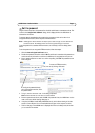
1. Make sure that the screws and plugs are appropriate for the wall/ceiling material.
2. Attach and secure the video encoder to the bracket.
3. Place the video encoder against the wall/ceiling, and mark the location of the two mounting
holes through which the bracket will be attached.
4. Remove the video encoder and drill the two mounting holes.
5. Insert the plugs, position the video encoder and secure it to the wall/ceiling using the screws.
Note:
The bracket can also be mounted on a pole using a cable tie.
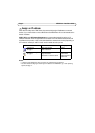
Connect the cables
The video encoder uses Power over Ethernet (PoE) and must be connected to a PoE-enabled
network.
1. Connect the encoder to the network using a shielded network cable. This cable is also used to
power the unit.
2. Connect a camera to the BNC port, or connect the covert camera to the tele plug port.
3. Check that the indicator LED:s indicate the correct conditions. See the table on page 13.
!
IMPORTANT! - The casing of the AXIS M7001 is not approved for outdoor use - the
product may only be installed in indoor environments.


Find Your Products By Category
- Photography
- Video Game
- Computer Equipment
- TV and Video
- Communications
- Automotive
- Portable Media
- Marine Equipment
- Cell Phone
- Baby
- Home Audio
- Fitness & Sports
- Power Tools
- Household Appliance
- Car Audio and Video
- Personal Care
- Kitchen Appliance
- Lawn and Garden
- Musical Instruments & Equipment
- Laundry Appliance
- Outdoor Cooking
Please Login
