
3.3
Owner's of the Sony Digital Camera Sony Digital Camera gave it a score of 3.3 out of 5. Here's how the scores stacked up:


94
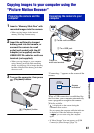
Using the “Music Transfer” (supplied)
You can change the Music files that are
preset at the factory to the desired Music
files using “Music Transfer” in the CD-
ROM (supplied). You can also delete or add
these files whenever you want.
The music formats you can transfer with
“Music Transfer” are listed below:
• MP3 files stored on the hard disk drive of your
computer
• Music on CDs
• Preset-music saved on the camera
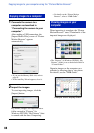
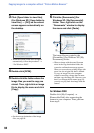
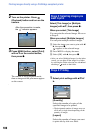
1 Press HOME button to display the
HOME screen.
2 Select (Slideshow) with
b/B on the control button, select
[ Music Tool] with v/V, then
press z.
3 Select [Download Music] with
v/V, then press z.
The message “Connect to PC” appears.
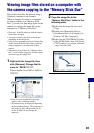
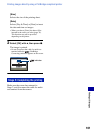
4 Make a USB connection between
the camera and your computer.
5 Start “Music Transfer”.
6 Follow the instructions on the
screen to add/change Music files.
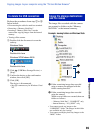
• To restore the music preset at the factory
to the camera:
1 Perform [Format Music] in step 3.
2 Execute [Restore defaults] on “Music
Transfer”.
All Music files return to the preset-music,
and [Music] in the [Slideshow] menu is set
to [Off].
• You can reset the Music files to the preset ones
using [Initialize] (page 69), however, other
settings will also be reset.
• For details on using “Music Transfer”, see the
on-line help in “Music Transfer”.
Adding/Changing Music using
“Music Transfer”


Find Your Products By Category
- Photography
- Video Game
- Computer Equipment
- TV and Video
- Communications
- Automotive
- Portable Media
- Marine Equipment
- Cell Phone
- Baby
- Home Audio
- Fitness & Sports
- Power Tools
- Household Appliance
- Car Audio and Video
- Personal Care
- Kitchen Appliance
- Lawn and Garden
- Musical Instruments & Equipment
- Laundry Appliance
- Outdoor Cooking
Please Login
