
3.7
Owner's of the Ryobi Drill HP412 gave it a score of 3.7 out of 5. Here's how the scores stacked up:

18 19
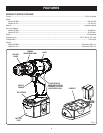
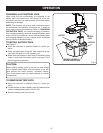
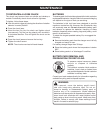
BATTERY PACK REMOVAL AND
PREPARATION FOR RECYCLING
To preserve natural resources, please
recycle or dispose of batteries
properly.
This product contains nickel-cadmium
batteries. Local, state or federal laws
may prohibit disposal of nickel-cadmium
batteries in ordinary trash.
Consult your local waste authority for information regarding
available recycling and/or disposal options.
WARNING:
Upon removal, cover the battery pack’s termi-
nals with heavy-duty adhesive tape. Do not at-
tempt to destroy or disassemble battery pack or
remove any of its components. Nickel-cadmium
batteries must be recycled or disposed of properly. Also,
never touch both terminals with metal objects and/or
body parts as short circuit may result. Keep away from
children. Failure to comply with these warnings could
result in fire and/or serious injury.
MAINTENANCE
18
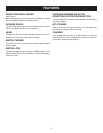
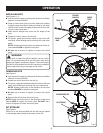
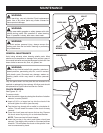
BATTERIES
The battery pack for this tool is equipped with nickel-cadmium
rechargeable batteries. Length of service from each charging
will depend on the type of work you are doing.
The batteries in this tool have been designed to provide
maximum trouble-free life. However, like all batteries, they
will eventually wear out. Do not disassemble battery pack
and attempt to replace the batteries. Handling of these
batteries, especially when wearing rings and jewelry, could
result in a serious burn.
To obtain the longest possible battery life, we suggest the
following:
n Remove the battery pack from the charger once it is fully
charged and ready for use.
For battery storage longer than 30 days:
n Store the battery pack where the temperature is below
80°F.
n Store battery packs in a “discharged” condition.
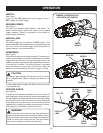
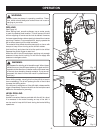
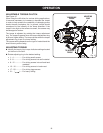
TO RETIGHTEN A LOOSE CHUCK
The chuck may become loose on spindle and develop a
wobble. Periodically check chuck screw for tightness.
To tighten, follow these steps:
n Lock the switch trigger by placing the direction of rotation
selector in center position.
n Open the chuck jaws.
n Insert the hex key into the chuck and tighten chuck
jaws securely. Tap the hex key sharply with a mallet in
a clockwise direction. This will tighten the chuck on the
spindle.
n Open the chuck jaws and remove the hex key.
n Tighten the chuck screw.
NOTE: The chuck screw has left hand threads.


Find Your Products By Category
- Photography
- Video Game
- Computer Equipment
- TV and Video
- Communications
- Automotive
- Portable Media
- Marine Equipment
- Cell Phone
- Baby
- Home Audio
- Fitness & Sports
- Power Tools
- Household Appliance
- Car Audio and Video
- Personal Care
- Kitchen Appliance
- Lawn and Garden
- Musical Instruments & Equipment
- Laundry Appliance
- Outdoor Cooking
Please Login
