
0
Owner's of the Cisco Systems Home Security System Cisco Asa 5505 10-User Bundle gave it a score of 0 out of 5. Here's how the scores stacked up:


4-8
Cisco ASA 5505 Adaptive Security Appliance Hardware Installation Guide
OL-18362-01
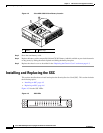
Chapter 4 Maintenance and Upgrade Procedures
Upgrading Memory
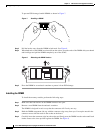
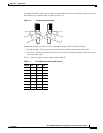
To prevent ESD damage, handle DIMMs as shown in Figure 7.
Figure 7 Handling a DIMM
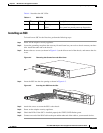
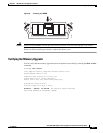
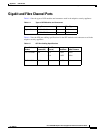
Step 3 Pull the latches away from the DIMM at both ends. See Figure 8.
Step 4 When both ends of the DIMM are released from the socket, grasp the ends of the DIMM with your thumb
and forefinger and pull the DIMM completely out of the socket.
Figure 8 Releasing the DIMM Latches
Step 5 Place the DIMM in an antistatic container to protect it from ESD damage.
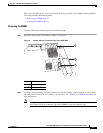
Installing the DIMM
To install the memory module, perform the following steps:
Step 1 Make sure that both latches on the DIMM connector are open.
Step 2 Remove a new DIMM from the antistatic container.
The DIMM is designed in such a way that the connector will fit only one way.
Step 3 Hold the DIMM component side up, with the connector edge away from you. Line up the notch in the
connector traces with the notch in the socket on the board.
Step 4 Carefully insert the connector edge into the socket and firmly press the DIMM into the socket until both
latches rotate to the close position against the DIMM. See Figure 9.
33115
1
1
2
203845


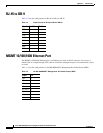
Find Your Products By Category
- Photography
- Video Game
- Computer Equipment
- TV and Video
- Communications
- Automotive
- Portable Media
- Marine Equipment
- Cell Phone
- Baby
- Home Audio
- Fitness & Sports
- Power Tools
- Household Appliance
- Car Audio and Video
- Personal Care
- Kitchen Appliance
- Lawn and Garden
- Musical Instruments & Equipment
- Laundry Appliance
- Outdoor Cooking
Please Login
