
0
Owner's of the Bushnell GPS Receiver Onix gave it a score of 0 out of 5. Here's how the scores stacked up:
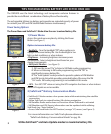

9
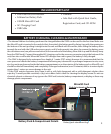
1. You must charge the battery pack before using the ONIX400. Attach the battery pack (first, verify
that the MicroSD card is installed in its slot), referring to the instructions and photos on pg. 5. Plug
the AC charger cord into the accessory port (pg. 6), then into an AC outlet (110-120 volt/60 cycle).
2. The initial charge may take up to 4 hours. A full charge is indicated when the status LED below the
orange Hot button changes from red to green. You may then disconnect the charger cord from the
outlet and accessory port. Store it safely for future use.
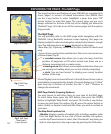
3. To ensure adequate satellite signal strength, make sure you are in a location with an unobstructed
view of the sky (GPS units typically do not work well indoors unless you are very near to a window)
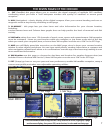
4. Press and hold the power button for a few seconds until the display starts up.
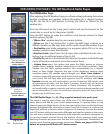
5. Press the MENU button briefly. You will see the Main Menu screen, with seven “pages” to choose
from. Use the 5-way switch to select (highlight) SAT , then press the “OK” (center) button.
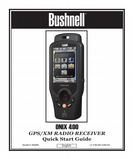
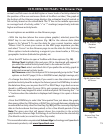
6. You are now viewing the Satellite (SAT) page. You will begin to see multiple icons on the circular
“radar” screen, representing the closest satellites to you in the global GPS system. These icons will
turn green as the ONIX “locks on” to each satellite, and the satellite ID# will be shown. The bar graph
below the “radar” screen indicates the relative signal strength of each satellite. Once you have a lock
on at least 3 or 4 satellites, you are ready to navigate. Note that the satellite “lock” process will take
longer (up to 3 or 4 minutes), the first time you use your GPS in a new geographical area, but will be
much faster on future usage in the same area
(see “Reset Data” in the SET Page>GPS options, if you
later relocate more than 300 miles away from your initial area)
. You can check reception with the SAT
page at any time, but will likely find that you use it less than any other page-in fact, you may simply
go directly to the MAP (or any other) page the next time you use your ONIX.
7. You’re ready to go! Let’s take a look in more detail at the other pages, then see how easy it is
to enjoy the many features and capabilities of the ONIX400 for yourself to mark and name your
own waypoints (locations or objects you want to return to later), navigate towards a nearby point
of interest, layer a compass or weather radar over the map, and even listen to a ball game or your
favorite music while you walk!
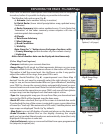
GETTING STARTED
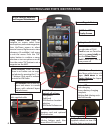
To use the XM Satellite Weather and/or Entertainment features of the ONIX400,
you will first need to set up your subscription to these XM services and activate
XM reception for your unit. It’s fast and easy... just follow the directions on the “XM
Satellite Service Activation” page included in your ONIX information pack, or call
1-800-985-9200. In order to activate the XM Radio services, you will need your XM
Radio ID number. This ID# can be found on the product label inside the battery pack
compartment, or on the SET page in the “Unit Info” (Go to the SET page, press UP or
DOWN buttons to highlight “Unit Info”, then press the OK button to display all unit
info, including your XM ID number).


Find Your Products By Category
- Photography
- Video Game
- Computer Equipment
- TV and Video
- Communications
- Automotive
- Portable Media
- Marine Equipment
- Cell Phone
- Baby
- Home Audio
- Fitness & Sports
- Power Tools
- Household Appliance
- Car Audio and Video
- Personal Care
- Kitchen Appliance
- Lawn and Garden
- Musical Instruments & Equipment
- Laundry Appliance
- Outdoor Cooking
Please Login
