
0
Owner's of the Black Box Cable Box Black Box Cable Box gave it a score of 0 out of 5. Here's how the scores stacked up:


12
2- AND 4-PORT SERVSWITCH DT PRO II
3. Installation
3.1 ServSwitch Placement
The 2- or 4-Port ServSwitch DT Pro II KVM Switch is small, portable, and designed
to fit on a desktop. Consider the following when deciding where to place the KVM
switch:
• How long are the cables attached to your keyboard, mouse, and monitor?
• How far away are the computers from the console?
• How long are the cables you use to connect your computers to the ServSwitch?
CAUTION
Do not place cables near machines that create electrical noise such as
fluorescent lighting, air conditioning equipment, etc.
3.2 Hardware Installation
This section provides instructions for the basic hardware setup of a single
ServSwitch.
CAUTION
Before you begin, make sure that power to all the devices that you will
be connecting is turned off.
To prevent damage caused by ground potential differences, make sure
that all devices are properly grounded. If you don’t follow these
instructions, your computers and/or the ServSwitch could be damaged.
3.2.1 C
ONNECTING THE
C
ONSOLE
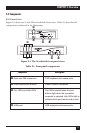
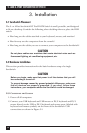
1. Power off all computers.
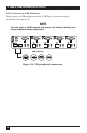
2. Connect your USB keyboard and USB mouse or PS/2 keyboard and PS/2
mouse directly to the USB or PS/2 keyboard and mouse ports (labeled with
keyboard and mouse symbols) on the front of the ServSwitch. USB
connections are shown in Figure 3-1.


Find Your Products By Category
- Photography
- Video Game
- Computer Equipment
- TV and Video
- Communications
- Automotive
- Portable Media
- Marine Equipment
- Cell Phone
- Baby
- Home Audio
- Fitness & Sports
- Power Tools
- Household Appliance
- Car Audio and Video
- Personal Care
- Kitchen Appliance
- Lawn and Garden
- Musical Instruments & Equipment
- Laundry Appliance
- Outdoor Cooking
Please Login
