

0
Owner's of the BenQ CRT Television Digital Projector gave it a score of 0 out of 5. Here's how the scores stacked up:
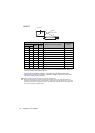


Operation20
Operation
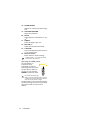
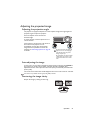
Starting up the projector
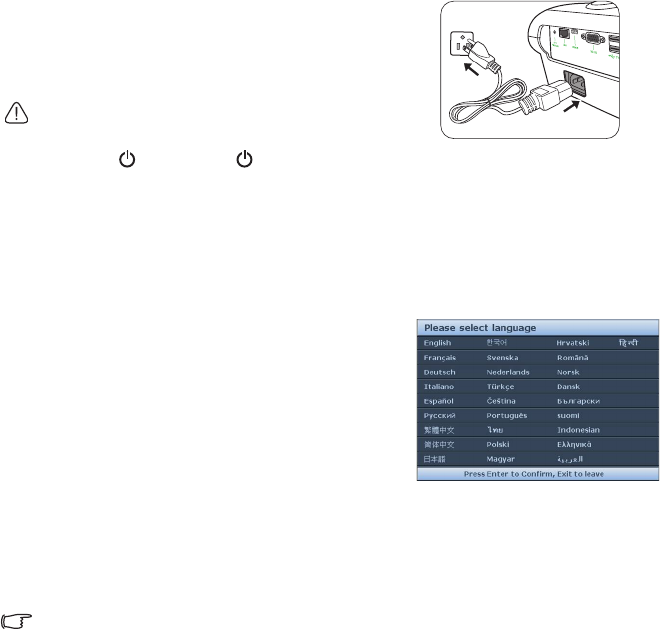
1. Plug the power cord into the projector and into a
power outlet. Turn on the power outlet switch
(where fitted). Check that the POWER indicator
light on the projector lights orange after power
has been applied.
Please use the original accessories (e.g. power cord) only with the
device to avoid possible dangers such as electric shock and fire.
2. Press POWER or ON to start the projector. As soon as the light source
lights up, a "Power On Tone" will be heard. The POWER indicator light flashes
green and stays green when the projector is on.
(If necessary) Rotate the focus ring to adjust the image clearness.
To turn off the ring tone, see "Turning off the Power On/Off Ring Tone" on page 36
for details.
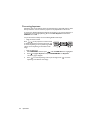
3. If the projector is activated for the first time,
select your OSD language following the on-
screen instructions.
4. If you are prompted for a password, press the
arrow keys to enter a six-digit password. See
"Utilizing the password function" on page 24 for
details.
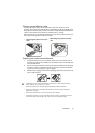
5. Switch all of the connected equipment on.
6. The projector will start to search for input
signals. The current input signal being scanned
displays in the upper left corner of the screen. If
the projector doesn't detect a valid signal, the message “No Signal” will continue
displaying until an input signal is found.
You can also press SOURCE on the projector or remote control to select your
desired input signal. See "Switching input signal" on page 27 for details.
If the frequency/resolution of the input signal exceeds the projector's operating range, you will see the
message “Out of Range” displayed on a blank screen. Please change to an input signal which is compatible with
the projector's resolution or set the input signal to a lower setting. See "Timing chart" on page 57 for details.


Find Your Products By Category
- Photography
- Video Game
- Computer Equipment
- TV and Video
- Communications
- Automotive
- Portable Media
- Marine Equipment
- Cell Phone
- Baby
- Home Audio
- Fitness & Sports
- Power Tools
- Household Appliance
- Car Audio and Video
- Personal Care
- Kitchen Appliance
- Lawn and Garden
- Musical Instruments & Equipment
- Laundry Appliance
- Outdoor Cooking
Please Login
