

0
Owner's of the Belkin TV Video Accessories NOT FOUND gave it a score of 0 out of 5. Here's how the scores stacked up:
1
2
3
4
5
6
7
8
section
15
Installation
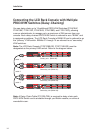
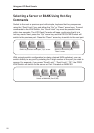
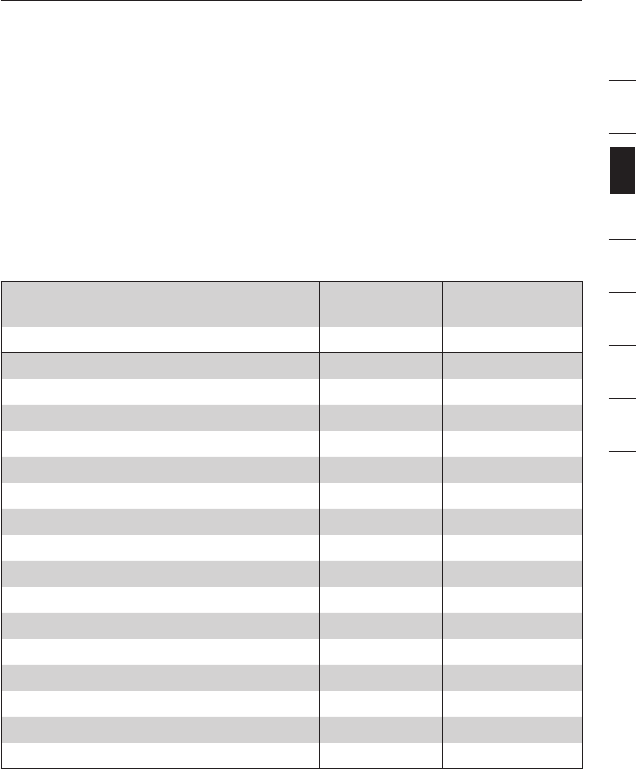
How to Assign a BANK Address
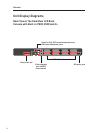
All PRO3 KVM Switches feature a “BANK DIP” switch. The “BANK DIP” switch is
used to assign the proper BANK address to each PRO3 KVM Switch.
• For a multi-unit configuration, the primary KVM switch (LCD Rack Console) is
always set to “BANK address 00”. Each secondary unit must be set to a unique
BANK address (from 01 through 15). Refer to the chart below for “BANK DIP”
switch settings.
BANK-DIP-Switch Configuration Chart
DIP SWITCH# BANK
ADDRESS
1 2 3 4 5 6
ON ON ON ON ON ON BANK 0 PRIMARY (default)
ON ON OFF ON ON ON BANK 1 SECONDARY
ON ON ON OFF ON ON BANK 2 SECONDARY
ON ON OFF OFF ON ON BANK 3 SECONDARY
ON ON ON ON OFF ON BANK 4 SECONDARY
ON ON OFF ON OFF ON BANK 5 SECONDARY
ON ON ON OFF OFF ON BANK 6 SECONDARY
ON ON OFF OFF OFF ON BANK 7 SECONDARY
ON ON ON ON ON OFF BANK 8 SECONDARY
ON ON OFF ON ON OFF BANK 9 SECONDARY
ON ON ON OFF ON OFF BANK 10 SECONDARY
ON ON OFF OFF ON OFF BANK 11 SECONDARY
ON ON ON ON OFF OFF BANK 12 SECONDARY
ON ON OFF ON OFF OFF BANK 13 SECONDARY
ON ON ON OFF OFF OFF BANK 14 SECONDARY
ON ON OFF OFF OFF OFF BANK 15 SECONDARY
ON = Up Position, OFF = Down Position
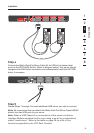
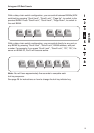
Example: Three 8-Port PRO3 KVM Switches (F1DA108Z) are daisy-chained
together with an LCD Rack Console to manage up to 32 servers. The DIP switch
on the primary KVM (LCD Rack Console) switch is set to “BANK 00” (factory
default) and the secondary units are each set to a unique BANK
(between 01 and 03).


Find Your Products By Category
- Photography
- Video Game
- Computer Equipment
- TV and Video
- Communications
- Automotive
- Portable Media
- Marine Equipment
- Cell Phone
- Baby
- Home Audio
- Fitness & Sports
- Power Tools
- Household Appliance
- Car Audio and Video
- Personal Care
- Kitchen Appliance
- Lawn and Garden
- Musical Instruments & Equipment
- Laundry Appliance
- Outdoor Cooking
Please Login
