
0
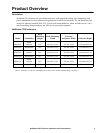
Owner's of the APC Indoor Furnishings NetShelter gave it a score of 0 out of 5. Here's how the scores stacked up:


NetShelter CX Enclosure: Installation and Customization6
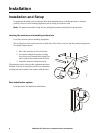
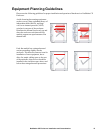
Configuration
Before installing the enclosure, plan the location and space needed to install equipment, and plan the
ergonomics of keyboards and video monitors. Improper airflow could damage installed components.
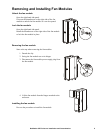
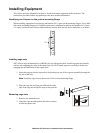
Blanking panels
Use blanking panels to close up large
open spaces in the CX but not to
completely seal the rack. The
NetShelter CX works best when air
can travel not just through the
equipment vents, but also above and
below any equipment that generates
thermal energy.
APC offers modular, plastic Airflow Management Blanking Panels that snap into place without tools
(AR8136BLK).
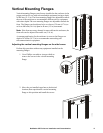
Front doors and Side Panels
The front doors and side panels may be opened or removed to access the interior. Locking side panels
offer additional security and assist with proper airflow within the enclosure. The locking side panel does
not ship locked. To avoid personal injury or damage to the enclosure, one person should support the door
or side panel while another person removes the door or side panel from its frame.
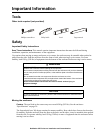
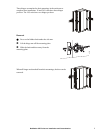
Hinge Operation
Installation . Slide the hinge on the door or side
panel into the front of the mounting plate attached to
the inside of the enclosure.
Using finger pressure, press the hinge onto the
mounting plate. The latch will secure with an
audible click.
CAUTION
WEIGHT AND LEVERAGE HAZARD
Doors and side panels are heavy. Removal or installation requires two people.
Failure to follow these instructions can result in moderate personal injury.
CLICK!


Find Your Products By Category
- Photography
- Video Game
- Computer Equipment
- TV and Video
- Communications
- Automotive
- Portable Media
- Marine Equipment
- Cell Phone
- Baby
- Home Audio
- Fitness & Sports
- Power Tools
- Household Appliance
- Car Audio and Video
- Personal Care
- Kitchen Appliance
- Lawn and Garden
- Musical Instruments & Equipment
- Laundry Appliance
- Outdoor Cooking
Please Login
